ge 4 device universal remote instruction manual
GE 4-Device Universal Remote Instruction Manual: Overview
This manual details setup and operation of your GE 4-Device Universal Remote, enabling control of up to four A/V devices with features like DVR and menu navigation.
What is a Universal Remote?
A universal remote control is a single device designed to operate multiple electronic devices, such as televisions, DVD players, cable boxes, and audio receivers. Instead of needing separate remotes for each device, a universal remote consolidates these functions into one convenient unit. This eliminates clutter and simplifies home entertainment control.
GE’s 4-Device Universal Remote is pre-programmed with codes for many popular brands, allowing users to easily control their devices. It offers a streamlined experience, reducing the need to juggle multiple remotes and offering features like direct sub-channel access and advanced DVR functionality.
GE 4-Device Remote: Key Features
The GE 4-Device Designer Series Universal Remote boasts several key features for enhanced user experience. It controls up to four devices, simplifying your home entertainment setup. A dedicated Blu-ray/DVD player open/close button adds convenience, while advanced DVR functions streamline recording management.
Simple menu navigation and a dot button for direct sub-channel access further enhance usability. The remote supports both direct code entry and auto code search programming methods, ensuring compatibility with a wide range of brands. Its designer series aesthetic blends seamlessly with modern home décor.
Package Contents
Your GE 4-Device Universal Remote package should include the following items: one (1) GE 4-Device Universal Remote Control unit, and one (1) User Manual providing detailed instructions for setup and programming; Please verify that all components are present upon opening the package.
Batteries are not included with the remote control; you will require two (2) AA or AAA batteries (depending on the specific model – check the battery compartment) to begin operation. A printed code list may or may not be included, depending on the packaging version; online code lists are readily available.

Getting Started: Battery Installation
Proper battery installation is crucial for remote functionality. This section guides you through inserting batteries correctly and safely for immediate use.
Battery Type Required
Your GE 4-Device Universal Remote requires two AAA batteries to operate effectively. While the remote may appear compatible with other battery sizes, using anything other than standard AAA alkaline batteries is strongly discouraged. Utilizing different battery types could potentially damage the remote’s internal components or lead to inconsistent performance.
Ensure the batteries are new and of good quality for optimal signal strength and longevity. Rechargeable batteries are also suitable, but always verify they are fully charged before installation. Avoid mixing old and new batteries, or different brands of batteries, as this can reduce performance and potentially cause leakage.
Installing Batteries Correctly
To install batteries, gently press down on the back of the remote and slide the battery cover downwards to remove it. Insert two AAA batteries, observing the correct polarity as indicated inside the battery compartment – matching the (+) and (-) symbols. Ensure the batteries are securely seated within the compartment.
Once the batteries are in place, carefully slide the battery cover back onto the remote until it clicks into position. Do not force the cover. If it doesn’t slide easily, double-check the battery orientation. Proper installation ensures a secure connection and reliable operation of your GE Universal Remote.
Battery Safety Precautions
Always use the correct battery type – two AAA batteries are required for optimal performance. Do not mix old and new batteries, or different types of batteries (e.g., alkaline, standard, or rechargeable). Remove batteries if the remote will not be used for an extended period to prevent leakage.
Leaking batteries can cause corrosion and damage the remote. If leakage occurs, clean the battery compartment with a dry cloth. Dispose of used batteries properly, following local regulations. Keep batteries out of reach of children and pets to avoid ingestion hazards.
Programming the Remote: Core Methods
Program your GE remote using direct code entry, auto code search, or the GE code list for TVs, DVD players, and other compatible devices.
Direct Code Entry Programming
Direct code entry is a reliable programming method. First, locate the code for your device brand from the included code list or online resources. Then, press and hold the ‘Setup’ button until the indicator light illuminates. Next, enter the five-digit code using the number buttons. If the code is correct, the indicator light will blink or turn off, confirming successful programming.
If the device doesn’t respond, repeat the process with another code for your brand. This method offers precise control and avoids lengthy searching, ensuring a quick setup for your GE universal remote.
Auto Code Search Programming
The auto code search method simplifies programming when you don’t have the specific code. Press and hold the ‘Setup’ button until the indicator light turns on. Then, press the ‘Power’ button repeatedly, and the remote will send codes to your device. Watch for your device to respond – when it turns off, immediately press the ‘Enter’ or ‘Setup’ button to lock in the code.
This process systematically cycles through codes, automatically finding a compatible one. Be patient, as it may take time, but it’s effective for devices not listed in the manual.
Using the GE Code List
The GE Code List provides specific codes for various brands, offering a direct programming method. Locate your device’s brand within the list, then find the corresponding code(s) provided. Press and hold the ‘Setup’ button until the indicator light activates. Enter the first code from the list using the number buttons, then release ‘Setup’.
If the device doesn’t respond, repeat the process with subsequent codes for that brand until successful. This method is faster when a known code is available.
Device-Specific Programming
This section guides programming for TVs, DVD/Blu-ray players, cable/satellite boxes, and audio receivers, ensuring compatibility and optimal control of your home entertainment system.
Programming a TV
To program your TV, first ensure the remote is in TV mode. Then, utilize either direct code entry or auto code search. For direct entry, consult the GE code list (online or printed) for codes specific to your TV brand.
Enter the code using the number buttons, and the remote will attempt to communicate with your TV. If successful, the TV will power off, confirming programming.
Alternatively, use auto code search: point the remote at the TV and press the ‘Set’ or ‘Code Search’ button, cycling through codes until the TV responds. Remember to test power and volume after each attempt!
Programming a DVD/Blu-ray Player
Begin by selecting the DVD mode on your GE universal remote. Similar to TV programming, you can employ either direct code entry or the auto code search method. Locate the appropriate codes for your DVD or Blu-ray player brand within the GE code list – available online or in the included manual.
Input the code using the number pad, then test functionality. If unsuccessful, initiate the auto code search, pointing the remote towards the player and cycling through codes until response.
Verify operation by attempting to open/close the disc tray and adjust volume.
Programming a Cable/Satellite Box
To program your GE remote for cable or satellite, first, enter the CBL or SAT mode. Utilize either direct code entry or the auto code search method, referencing the GE code list for your specific provider (e.g., Comcast, Dish, DirecTV). Input the code carefully using the number pad, then test functionality by attempting channel changes and volume adjustment.
If the initial code fails, initiate the auto code search, pointing the remote at the box and cycling through codes until a response is observed. Confirm successful programming with basic functions.
Programming an Audio Receiver
To program your GE remote for an audio receiver, enter the AUD mode; Employ either direct code entry, consulting the GE code list for your receiver’s brand (e.g., Sony, Yamaha, Bose), or utilize the auto code search function. Input the code precisely via the number pad, then verify operation by testing volume control, input selection, and power on/off.
If the initial code doesn’t work, initiate the auto code search, aiming the remote at the receiver and cycling through codes until a response is detected. Confirm successful programming with core functions.
Advanced Features & Functions
Explore enhanced control with DVR functionality, streamlined menu navigation, and convenient sub-channel access using the dedicated dot button for a superior experience.
DVR Functionality
The GE 4-Device Universal Remote simplifies managing your Digital Video Recorder (DVR). Utilize dedicated buttons for playback controls – play, pause, stop, rewind, and fast forward – directly from the remote. Access recorded programs effortlessly, navigating through your library with ease. This feature streamlines your viewing experience, eliminating the need to juggle multiple remotes.
Specific DVR functions may vary depending on your service provider and DVR model, but the remote is designed to offer core control capabilities. Consult your DVR’s manual for advanced features and specific button mappings for optimal performance with this universal remote.
Menu Navigation
Effortlessly navigate device menus with the GE 4-Device Universal Remote’s intuitive controls. The standard directional buttons – up, down, left, and right – allow precise movement through on-screen menus. Use the ‘OK’ or ‘Select’ button to confirm choices and the ‘Menu’ button to directly access the device’s main menu.
This streamlined navigation simplifies settings adjustments, content selection, and overall device control. The remote’s responsiveness ensures a smooth and user-friendly experience. Remember that menu layouts vary by device, but these core controls provide universal access.
Sub-Channel Access (Dot Button)
The dedicated ‘Dot’ button on your GE 4-Device Universal Remote provides quick access to sub-channels, a feature particularly useful for expanded cable or satellite TV packages. Instead of scrolling through numerous channels, simply press the ‘Dot’ button followed by the desired sub-channel number.
This function streamlines channel selection, saving you time and effort. It’s especially convenient for accessing premium channels or specialized programming offered as sub-channels by your provider. Ensure your service supports sub-channels for this feature to function correctly.

Troubleshooting Common Issues
Resolve typical problems like unresponsive remotes, devices failing to power on/off, or incorrect code entries with our guide to ensure seamless operation.
Remote Not Responding
If your GE Universal Remote isn’t responding, first ensure fresh batteries are correctly installed, observing proper polarity. Confirm no obstructions are blocking the IR sensor on both the remote and the target device. Try resetting the remote to its factory settings by removing the batteries for several minutes, then reinserting them.
Also, verify the selected device mode on the remote matches the device you’re attempting to control. If issues persist, test the remote using a camera phone; if you don’t see a flashing light when pressing buttons, the remote may be faulty and require replacement.
Device Not Turning On/Off
If a device isn’t responding to the power command, double-check the programmed code for that device is correct. Re-enter the code using the direct code entry method or repeat the auto code search. Ensure the device itself is plugged in and receiving power, and that any physical power switches are enabled.
Sometimes, a device may not fully support all remote functions; try other commands to confirm basic communication. If still unsuccessful, consult the GE support website for device-specific troubleshooting or a more updated code list;
Incorrect Code Entered
Experiencing issues where the remote isn’t functioning correctly? An incorrect code is a common culprit. If buttons perform unintended actions, or the device doesn’t respond as expected, the entered code likely doesn’t match your device’s manufacturer or model. Carefully re-enter the code, verifying each digit against the GE code list or the online database.
Remember to try multiple codes listed for your device brand, as compatibility can vary. If problems persist, initiate the auto code search again for a potentially more accurate match.
Understanding the Remote Layout
Familiarize yourself with button functions and indicator lights; this remote features dedicated controls for TVs, DVD players, and cable boxes for easy navigation.
Button Identification
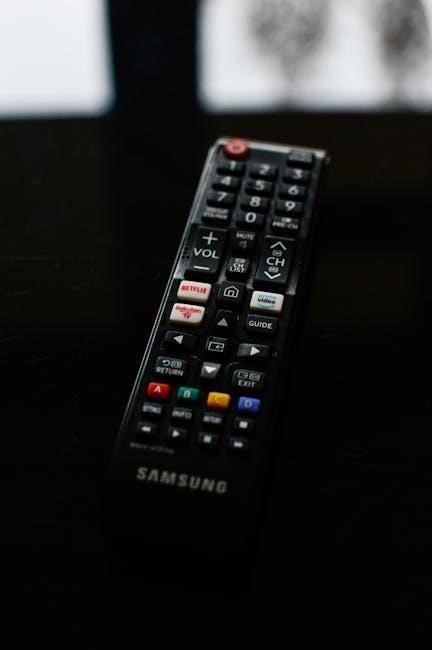
The GE 4-Device Universal Remote boasts a variety of buttons designed for seamless control of your home entertainment system. Key buttons include power, input selection, volume control, channel navigation, and menu access. Dedicated buttons for devices like DVD players often include open/close functionality. The numeric keypad facilitates direct channel entry, while color buttons aid in on-screen menu navigation. A ‘dot’ button provides sub-channel access. Furthermore, device selection buttons allow quick switching between programmed devices. Understanding each button’s purpose is crucial for maximizing the remote’s capabilities and enjoying a streamlined viewing experience. Refer to the full layout diagram for precise locations.
Remote Indicator Lights
The GE 4-Device Universal Remote utilizes indicator lights to communicate its operational status. Typically, a light illuminates during button presses, confirming signal transmission. During programming, a flashing light often indicates the remote is searching for or receiving a code. A sustained light may signal successful code lock-in. If the light doesn’t illuminate, check battery installation. Understanding these light patterns is vital for troubleshooting programming issues and ensuring proper functionality. Consult the troubleshooting section if lights behave unexpectedly, as this could indicate a system error or low battery power.
Button Functions Explained
The GE 4-Device Remote features dedicated buttons for power, input selection, volume, and channel control. Device buttons (TV, DVD, CBL, AUX) select which device the remote commands. Navigation buttons (up, down, left, right, OK) control on-screen menus. The ‘Menu’ button accesses device-specific menus, while ‘DVR’ provides playback controls. A ‘Sub-Channel’ or ‘Dot’ button enables access to sub-channels. The ‘Open/Close’ button operates DVD/Blu-ray tray. Familiarizing yourself with each button’s function streamlines operation and maximizes the remote’s capabilities for effortless home entertainment control.
Finding GE Remote Codes
Locate device-specific codes via online lists, the GE Support website, or the printed code list included with your remote for successful programming.
Online Code Lists
Numerous websites compile extensive lists of GE remote control codes, offering a convenient alternative to the printed manual. These online resources are frequently updated with codes for newer devices and brands, increasing the likelihood of finding a compatible code for your specific equipment.
A simple web search for “GE universal remote code list” will yield several options. Be sure to verify the source’s reliability and cross-reference codes if possible. Some websites allow users to input their device brand and model number to narrow down the search, streamlining the process. Remember that code lists can vary, so trying multiple codes is sometimes necessary to achieve functionality.
GE Support Website
The official GE Appliances support website is a valuable resource for finding remote control codes and troubleshooting assistance. It often features a dedicated section for universal remotes, including downloadable code lists specifically tailored to GE models like the 33709, 33711, and 33710.
Navigating the GE support site allows you to search by remote model number or device type, providing a more focused code search. Additionally, the website may offer FAQs, user manuals, and contact information for direct support if you encounter difficulties programming your remote. Utilizing the official source ensures you’re accessing accurate and up-to-date information.
Using the Printed Code List (if included)
Some GE 4-Device Universal Remotes include a printed code list, offering a convenient offline method for programming. This list organizes codes by device brand, simplifying the search process. Locate your device manufacturer within the list and try the corresponding codes sequentially, following the remote’s programming instructions.
If the device responds correctly – typically by turning off or changing the volume – you’ve found the correct code. Remember to test all functions to ensure full compatibility. If none of the listed codes work, consult the online code lists or GE support website for additional options or alternative programming methods.
Resetting the Remote
To restore factory settings, or clear programmed codes, follow the specific reset procedure outlined in this manual for optimal performance and troubleshooting.
Factory Reset Procedure
Performing a factory reset will erase all currently programmed device codes from the remote’s memory, returning it to its original, out-of-the-box state. This is useful when experiencing persistent programming issues or preparing the remote for use with a completely new set of devices. Typically, this involves simultaneously pressing and holding a combination of buttons – often the ‘Setup’ or ‘Magic’ button alongside the ‘Mute’ button – for several seconds, until the remote’s indicator light flashes or changes color.
Consult the specific code list or the GE support website for the exact button combination for your remote model (e.g., 33709, 33711, 33710). After the reset, you will need to reprogram each device individually using either direct code entry or the auto code search method.
Clearing Existing Codes
To clear codes for a single device without performing a full factory reset, you can typically use a specific procedure involving pressing and holding the ‘Setup’ button, then entering the device number (1-4) corresponding to the device you wish to erase the code from; Following this, you’ll usually press the ‘Mute’ or ‘Power’ button until the indicator light confirms the code has been cleared.
This allows targeted code removal, useful if only one device’s programming is causing issues. Refer to your remote’s model-specific instructions (33709, 33711, 33710) for the precise sequence, as it can vary.
Remote Control Specifications
GE 4-Device remotes (models 33709, 33711, 33710) offer broad compatibility with TVs, DVD players, cable boxes, and audio receivers for convenient control.
Model Numbers (e.g., 33709, 33711, 33710)
This GE Universal Remote is available in several model numbers, each offering similar functionality. Commonly found models include the 33709, known for its brushed nickel finish, and the 33711, often part of the Designer Series. The 33710 is another frequently encountered variant.
While slight cosmetic differences may exist between these models, the core programming methods – direct code entry and auto code search – remain consistent across all versions. Regardless of the specific model number, this instruction manual provides comprehensive guidance for setting up and utilizing your GE 4-Device Universal Remote effectively;
Compatibility List (General)
The GE 4-Device Universal Remote boasts broad compatibility, supporting a vast array of brands and device types. It generally works with most popular television manufacturers, including Samsung, Sony, LG, and Vizio. DVD and Blu-ray player support extends to brands like Panasonic, Philips, and Toshiba.
Cable and satellite box compatibility encompasses providers such as Comcast, Dish Network, and DirecTV. Audio receiver support includes brands like Yamaha, Pioneer, and Denon. However, specific code availability varies; consulting the GE code list is recommended to confirm compatibility with your particular devices.

Safety Information & Warranty
Important safety precautions should be observed when using this GE 4-Device Universal Remote. Do not expose the remote to extreme temperatures or moisture. Avoid dropping or disassembling the device, as this may cause damage or electrical shock. Only use the specified battery type (AA or AAA, depending on model).
Regarding warranty, GE typically offers a limited one-year warranty against defects in materials and workmanship. This warranty does not cover damage resulting from misuse, accidents, or unauthorized repairs. Retain your proof of purchase for warranty claims.