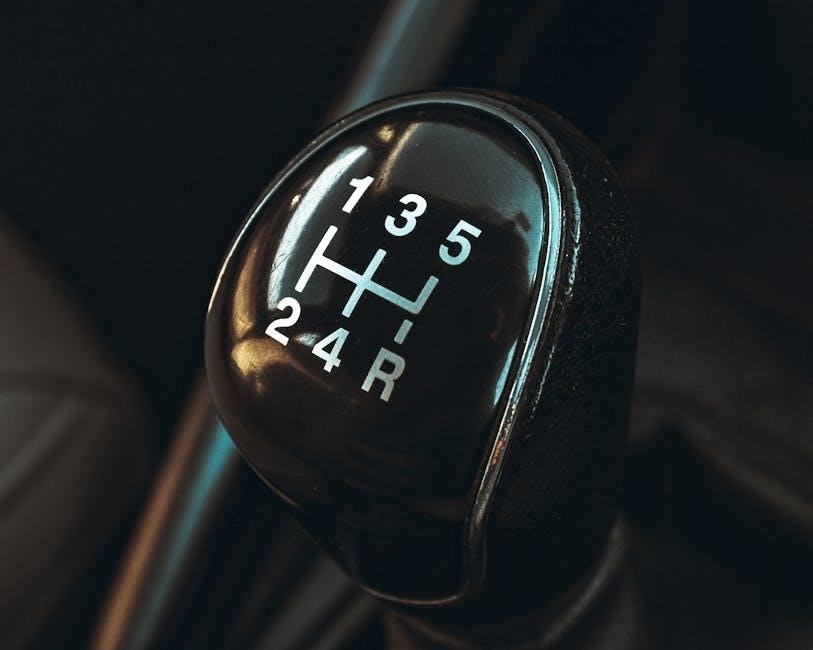
All posts by dolly

bosch maxx classic washing machine manual

The Bosch Maxx Classic Washing Machine is a reliable and efficient appliance designed for everyday use, offering multiple wash cycles and eco-friendly modes. Its user-friendly interface and robust features make it ideal for various fabric types, ensuring optimal cleaning while saving energy.

Overview of the Bosch Maxx Classic Series

The Bosch Maxx Classic Series is a line of high-performance washing machines designed to deliver efficient cleaning with minimal energy consumption. Known for their durability and user-friendly interface, these machines offer a range of wash cycles tailored for different fabric types. The series features eco-friendly modes, advanced spin speeds, and a robust design to handle daily laundry needs. With a focus on reliability and innovation, the Bosch Maxx Classic Series has become a popular choice for households seeking a balance between performance and affordability. The user manual provides detailed guidance on optimizing its features and maintaining peak performance.

Importance of the User Manual

The user manual is an essential guide for understanding and operating the Bosch Maxx Classic Washing Machine effectively. It provides detailed instructions on using features, troubleshooting common issues, and performing routine maintenance. The manual ensures users can optimize wash performance, customize settings, and address minor faults independently. Additionally, it highlights safety precautions and warranty information, helping users avoid potential damage and extend the machine’s lifespan. By following the manual, users can ensure efficient, safe, and long-term operation of their Bosch Maxx Classic Washing Machine, making it a vital resource for everyday use.

Key Features of the Bosch Maxx Classic

The Bosch Maxx Classic offers multiple wash cycles, eco-mode for energy efficiency, and a large loading capacity. It features durable construction, user-friendly controls, and advanced settings for customized cleaning.

Wash Cycles and Programmes

The Bosch Maxx Classic offers a variety of wash cycles tailored for different fabric types and soil levels. Choose from gentle cycles for delicate fabrics, intense modes for heavily soiled clothes, or specialized programmes like wool and synthetic care. The machine also features eco-mode, which optimizes water and energy usage for eco-friendly cleaning. Additionally, programmes like quick wash and pre-treatment options ensure flexibility and efficiency, catering to diverse household needs. These customizable settings allow users to achieve optimal results while preserving fabric integrity.

Energy Efficiency and Eco Mode

The Bosch Maxx Classic Washing Machine excels in energy efficiency, featuring an Eco Mode that optimizes water and energy consumption. This mode ensures lower power usage while maintaining thorough cleaning performance. The machine is designed with advanced sensor technology to detect load size and adjust resources accordingly, reducing waste. By utilizing eco-friendly settings, users can significantly cut energy costs and environmental impact. The Eco Mode is ideal for everyday laundry, providing a balance between efficiency and effectiveness, making it a sustainable choice for modern households.

Capacity and Loading Options

The Bosch Maxx Classic Washing Machine offers a generous capacity of up to 8 kilograms, making it suitable for large families or bulk laundry. The front-loader design allows for easy loading and unloading, while the wide drum opening ensures convenient access. The machine features multiple loading options, catering to different fabric types and soil levels. With advanced sensors, it detects the load size and optimizes water and detergent usage accordingly. This ensures efficient washing while minimizing waste. The spacious interior and flexible loading options make it ideal for handling everything from delicate fabrics to heavily soiled items with ease and precision.

Installation and Setup

Unpack and place the Bosch Maxx Classic Washing Machine on a level surface. Connect water and power supplies according to the manual. Ensure proper levelling for stable operation.

Unpacking and Placement Guidelines

When unpacking the Bosch Maxx Classic Washing Machine, carefully remove all packaging materials and protective covers. Place the machine on a level, stable surface to ensure balance. Ensure there is adequate space around the unit for proper ventilation. Check the floor for evenness and use the adjustable feet if necessary. Keep the area clear to avoid obstruction. Follow the manual’s instructions for correct positioning to guarantee optimal performance and safety during operation.

Connecting Water and Power Supplies

Connect the Bosch Maxx Classic Washing Machine to a cold water supply using the provided hoses. Ensure the water pressure is within the recommended range (0.1–10 bar). Attach the inlet hoses securely to the machine and water taps to prevent leaks. Plug the power cord into a grounded electrical outlet rated for 230V, 50Hz. Avoid using extension cords to maintain safety and performance. After connections, check for any water leaks by running a short cycle. Proper connections ensure safe and efficient operation of the washing machine.

Levelling the Washing Machine

Proper levelling ensures stable operation and reduces vibrations. Place the Bosch Maxx Classic on a firm, even floor; Adjust the machine’s feet by turning them clockwise or counterclockwise until it stands level. Use a spirit level to check balance across all four corners. Ensure the washing machine does not tilt to any side. Tighten the locking nuts once the desired level is achieved. An unlevelled machine may cause noise, poor performance, or damage. Double-check the levelling after installation to ensure optimal functioning and safety during use.

Operating the Bosch Maxx Classic

Operating the Bosch Maxx Classic is straightforward, with an intuitive control panel. Select desired wash cycles, adjust settings, and start with ease. Ensures efficient and optimal performance.

Understanding the Control Panel

The Bosch Maxx Classic control panel is designed for simplicity and convenience. It features a clear LED display and intuitive buttons for selecting wash cycles, temperature, and spin speed.
The panel includes options for delayed start, eco mode, and special programs like delicate or heavy-duty cycles.
Each button corresponds to specific functions, making it easy to customize your wash settings.
The LED display provides real-time updates on the wash cycle progress, ensuring you stay informed.
With clear labels and a logical layout, the control panel simplifies operation for users of all skill levels.

Selecting the Right Wash Programme

Selecting the appropriate wash programme on your Bosch Maxx Classic ensures optimal cleaning for various fabric types. The machine offers a range of options, including delicate, normal, and heavy-duty cycles.
For everyday laundry, the normal cotton programme is ideal.
Delicate fabrics benefit from the gentle wool or silk settings.
Heavily soiled items are best cleaned with the intensive wash cycle.
Additionally, programmes like eco mode save energy and water while maintaining performance.
Always refer to the care labels on your garments to match the fabric type with the correct programme for the best results.

Adding Detergent and Pre-Treatment

For optimal results, add detergent directly to the detergent drawer or compartment in your Bosch Maxx Classic.
Use the recommended dosage based on the load size and soil level.
Pre-treatment of stubborn stains with liquid detergent or stain remover is advised before washing.
Always follow the detergent manufacturer’s guidelines to avoid overuse, which can affect washing performance.
For delicate fabrics, consider using a mild detergent to prevent damage.
Ensure the detergent drawer is clean and free of residue for proper dispensing.
Refer to your user manual for specific recommendations on detergent types and usage.

Maintenance and Care

Regularly clean the detergent drawer, check water supply hoses, and descale the machine to maintain performance and longevity. Ensure proper ventilation to prevent mould growth.

Cleaning the Detergent Drawer

Cleaning the detergent drawer is essential for maintaining your Bosch Maxx Classic’s performance. Regularly remove and rinse the drawer under warm water to eliminate residue. Soak it in a mixture of water and vinegar to tackle stubborn stains. Ensure it’s completely dry before reinserting to prevent mould growth. This simple maintenance step ensures optimal detergent distribution and fresh wash cycles. Always refer to your user manual for specific guidance on removing and cleaning the drawer effectively.

Checking and Cleaning the Water Supply

Regularly inspect and clean the water supply to ensure optimal performance. Turn off the water supply and disconnect the hoses. Check for blockages or debris in the filters and clean them thoroughly. Use a soft brush or cloth to remove any sediment or limescale buildup. Reassemble and reconnect the hoses securely. For hard water areas, consider descaling the supply lines periodically. This maintenance prevents poor water flow and extends the machine’s lifespan. Always refer to your Bosch Maxx Classic manual for detailed guidance on this process.

Descaling the Washing Machine

Descaling your Bosch Maxx Classic washing machine is essential for maintaining its efficiency, especially in areas with hard water. Mineral deposits from water can accumulate inside the machine, leading to reduced performance and potential damage. To descale, use a descaling solution or vinegar. Place the solution in the detergent drawer and run a hot water cycle without clothes. For optimal results, use a cleaning or maintenance cycle if available. Afterward, leave the lid open to dry and run a short rinse cycle to remove any residue. Regular descaling, ideally every few months, ensures optimal performance and longevity. Always refer to your user manual for specific guidance.

Troubleshooting Common Issues

Identify error codes like F00 or E02, which indicate firmware issues or sensor malfunctions. Address musty smells by cleaning the gasket and leaving the lid open. Regularly check filters and ensure proper detergent use to avoid clogs and poor wash performance. Refer to the manual for detailed solutions and maintenance tips to resolve minor faults effectively.

Identifying Error Codes

The Bosch Maxx Classic displays error codes like F00, E00, or E02, indicating issues such as firmware faults or sensor malfunctions. F00 often suggests a software glitch, while E02 points to a faulty water level sensor. To resolve these, restart the machine, check sensors, or consult the manual. Regular maintenance, like cleaning filters and ensuring proper detergent use, can prevent errors. Refer to the troubleshooting section for detailed solutions and ensure optimal performance by addressing issues promptly. Proper identification and resolution of error codes help extend the machine’s lifespan and maintain efficiency. Always follow the manual’s guidance for accurate repairs.

Resolving Minor Faults

Minor faults in the Bosch Maxx Classic can often be resolved with simple troubleshooting. If the machine does not start, check the power supply and ensure the child lock is not activated. For unusual noises, inspect the drum for loose objects and clean the pump filter. If vibrations occur, ensure the machine is level and evenly loaded. Regularly cleaning the detergent drawer and gasket helps prevent mould and odours. Always restart the machine after addressing an issue. For persistent problems, refer to the error code guide or consult the manual for detailed solutions to restore optimal performance and extend the machine’s lifespan.

Addressing Musty Smells and Mould

Musty smells and mould in the Bosch Maxx Classic can be tackled by regular maintenance. After each use, leave the door slightly open to allow the interior to dry. Clean the detergent drawer and gasket regularly with warm water and vinegar. Run a hot water cycle without detergent to eliminate odours. Check and clean the water supply filters to ensure proper drainage. Descaling the machine periodically also helps prevent mould buildup. For persistent issues, mix equal parts water and white vinegar in a wash cycle to sanitize the drum and freshen the machine. Regular cleaning ensures a hygienic and odour-free washing environment.

Advanced Settings and Customization

The Bosch Maxx Classic offers advanced customization options, including adjustable spin speeds, timer delays, and child lock features for tailored washing experiences and enhanced convenience.

Adjusting Spin Speed

To adjust the spin speed on your Bosch Maxx Classic washing machine, begin by selecting the desired wash program. Once chosen, locate the spin speed button, typically labeled with numbers (e.g., 400, 800, 1200 RPM). Press this button to cycle through available options. Lower RPM settings are ideal for delicate fabrics, while higher settings effectively remove more water. Refer to your user manual for specific instructions and recommendations based on fabric type to ensure optimal performance and fabric care.

Setting Timer Delays

The Bosch Maxx Classic washing machine allows you to set a timer delay, enabling you to schedule your wash cycle to start at a convenient time. To do this, select your desired wash program first. Next, press the “Start/Pause” or “Delay Start” button, depending on your model, and use the +/- buttons to choose the delay time. The machine will display the selected delay time and automatically begin once the countdown is complete. This feature is perfect for ensuring your laundry finishes when you’re ready to handle it, optimizing your daily routine.

Activating Child Lock

To activate the Child Lock on your Bosch Maxx Classic washing machine, press and hold the “Start/Pause” button for approximately 5 seconds until a lock icon appears on the display. This feature prevents accidental changes to the wash program or settings. To deactivate, repeat the same process. The Child Lock ensures safe operation, especially in households with children, by locking the control panel during the wash cycle.

Replacement and Repair

The Bosch Maxx Classic Washing Machine may require occasional part replacements, such as the door gasket or water pump, to maintain optimal performance and longevity.

Replacing the Door Gasket

Replacing the door gasket on your Bosch Maxx Classic Washing Machine is essential to prevent leaks and maintain hygiene. Start by purchasing a compatible replacement gasket from an authorized Bosch dealer. Turn off the power supply and unplug the machine for safety. Remove the old gasket by gently pulling it away from the door frame. Clean the area thoroughly to ensure a proper seal. Install the new gasket by aligning it with the door frame and pressing firmly until it clicks into place. Reassemble any components you removed and test the machine to ensure no leaks occur.

Fixing the Water Pump

To fix the water pump on your Bosch Maxx Classic Washing Machine, start by disconnecting the power supply and draining the water. Locate the pump, usually at the bottom, and remove any debris or blockages. If damaged, replace the pump with a Bosch-approved part. Disconnect the hoses and electrical connections carefully. Install the new pump, ensuring all connections are secure. Reassemble the machine and test by running a short cycle. Regularly cleaning the pump filter can prevent future issues. Always consult the manual or a professional if unsure.

Checking the Belt and Motor

Regularly inspect the belt and motor of your Bosch Maxx Classic Washing Machine to ensure smooth operation. Turn off the power and disconnect the machine. Visually examine the belt for cracks or wear. If damaged, replace it with a Bosch-approved belt. Check the motor for unusual noise or vibration, which may indicate imbalance or misalignment. Ensure all connections are secure and clean. Refer to the manual for specific guidance. If issues persist, consult a professional. Proper maintenance helps extend the machine’s lifespan and prevents unexpected breakdowns. Always prioritize safety when working with electrical components.

Environmental and Safety Considerations

The Bosch Maxx Classic Washing Machine emphasizes eco-friendly operation with energy-saving modes. Proper disposal of packaging and recyclable parts is encouraged. Always follow safety guidelines to protect children and ensure safe usage.

Energy-Saving Tips

To maximize energy efficiency with your Bosch Maxx Classic Washing Machine, opt for the Eco Mode, which reduces energy consumption while maintaining performance. Always select the appropriate wash cycle based on load size and fabric type to avoid unnecessary energy usage. Using cold water settings can significantly lower electricity consumption. Ensure the machine is fully loaded but not overloaded, as this optimizes energy use. Regularly cleaning the detergent drawer and checking water supply filters can also improve efficiency. Proper maintenance, like descaling, ensures the machine runs efficiently, saving energy over time.

Proper Disposal of Packaging

When unpacking your Bosch Maxx Classic Washing Machine, ensure all packaging materials are disposed of responsibly. Separate recyclable materials like cardboard and plastic for proper recycling. Check local regulations for guidelines on disposing of non-recyclable items. Avoid littering and ensure hazardous materials, such as packaging foam, are handled safely. Proper disposal helps reduce environmental impact and promotes sustainability. Refer to your local waste management services for guidance on eco-friendly disposal methods. By following these steps, you contribute to a cleaner and greener environment while adhering to environmental standards.

Safety Precautions for Children

Always keep children away from the Bosch Maxx Classic Washing Machine while it is in operation. Ensure the child lock feature is activated to prevent accidental start or interference with controls. Secure any loose parts or accessories to avoid tripping or entanglement hazards. Supervise children near the machine to prevent them from climbing or playing on it. Teach children the dangers of tampering with the appliance and never allow them to insert hands or objects into the drum. For additional safety measures, refer to the user manual for detailed guidelines on child safety features and precautions.

User Tips and Tricks

Regularly clean the detergent drawer and check filters for optimal performance. Use the eco-mode for energy savings and activate the child lock for safe operation. Always measure detergent according to load size for best results and to prevent residue buildup.

Optimizing Wash Performance

To optimize wash performance in your Bosch Maxx Classic, sort clothes by fabric type and soil level. Select the appropriate wash cycle for the load, ensuring optimal cleaning without damage. Use the correct detergent dosage to avoid residue buildup and improve rinse efficiency. Regularly clean the detergent drawer and check filters to maintain water flow and prevent blockages. For tough stains, pre-treat fabrics before washing. Utilize the eco-mode for energy savings while still achieving effective cleaning. Finally, ensure the machine is properly levelled to avoid vibrations and maintain balance during operation.

Removing Stubborn Stains

For removing stubborn stains on your Bosch Maxx Classic, pre-treat fabrics with a stain remover or laundry detergent before washing. Apply directly to the stain, gently rub it in, and let it sit for 5-10 minutes. Select the intensive wash cycle for heavily soiled items. For tough stains like grease or ink, use a pre-wash stain remover pen or liquid detergent. Avoid using fabric softeners in the pre-wash phase to ensure optimal stain removal. Always check care labels to ensure the treatment won’t damage the fabric. Regularly cleaning the detergent drawer and filters can also improve wash performance and stain removal efficiency.

Extending the Life of the Machine

To extend the life of your Bosch Maxx Classic, regular maintenance is essential. Clean the detergent drawer and water supply filters monthly to prevent buildup and blockages. Descaling the machine every 3-6 months ensures optimal performance and prevents lime-scale damage. After each use, leave the door slightly open to allow moisture to evaporate, reducing mould growth. Regularly check and clean the drain pump filter to avoid clogs. Always follow the recommended detergent dosage and avoid overloading the machine. Proper care and timely maintenance will ensure your Bosch Maxx Classic operates efficiently for years to come.

The Bosch Maxx Classic Washing Machine is a durable and efficient appliance, combining advanced features with user-friendly design. Proper maintenance and care ensure long-lasting performance and satisfaction.

Final Thoughts on the Bosch Maxx Classic

The Bosch Maxx Classic Washing Machine stands out as a reliable and efficient appliance, offering a blend of durability and advanced features. Its user-friendly design and versatile wash cycles make it suitable for various household needs. With proper maintenance, the machine ensures long-lasting performance and energy efficiency. The availability of detailed manuals and troubleshooting guides further enhances its usability. Overall, the Bosch Maxx Classic is a practical choice for those seeking a balance between quality and affordability, ensuring clean and fresh laundry with minimal effort.

Encouraging Proper Usage and Maintenance

Regular maintenance and proper usage are essential to ensure the Bosch Maxx Classic Washing Machine operates efficiently and lasts longer. Always refer to the user manual for guidance on cleaning, descaling, and addressing minor faults. Simple practices like leaving the door open after use and checking water supply filters can prevent musty smells and mould. By following energy-saving tips and adhering to loading recommendations, users can optimize performance and reduce wear and tear. Proper care not only enhances the machine’s reliability but also contributes to eco-friendly operation and lower utility bills over time.

manual high school photos

Manual High School photos showcase vibrant student life, campus activities, and achievements.
Graduation ceremonies, sports events, and the Multicultural Fair highlight the school’s spirit.
The Branded Arts Festival and student clubs also feature prominently in the imagery.

Manual High School is a vibrant educational institution dedicated to empowering students to reach their full potential. With a rich history and a commitment to excellence, the school provides a nurturing environment for academic and personal growth. Known as the home of the Rams, Manual High School fosters a strong sense of community and school spirit. The campus is a hub of activity, with students engaging in various clubs, sports, and cultural events. Photos of the school capture the energy of its student body, from lively sports games to creative art projects. Principal Nick Dawkins has been instrumental in shaping the school’s vision, ensuring that every student feels supported. The school’s logo, featuring an “M” with a thunderbolt, symbolizes strength and ambition. Through its programs and events, Manual High School prepares students to excel in all areas of life.

Historical Background of Manual High School

Manual High School, established in the early 20th century, has a rich and storied history that reflects the evolution of education in its community. Originally founded to provide vocational training, the school has since expanded its mission to offer a comprehensive academic program. Over the years, Manual High School has undergone significant changes, including a temporary closure in 2006 and subsequent reopening, which reignited its commitment to student success. The school’s name has also evolved, with some campuses adopting the “duPont Manual High School” title following substantial donations. Historical photos reveal the school’s transformation, from its early industrial focus to its modern emphasis on diversity and inclusion. The legacy of Manual High School is marked by resilience, innovation, and a dedication to empowering future generations. Its history is a testament to the enduring importance of education in shaping communities.

Campus and Facilities Photos

The campus of Manual High School is a blend of historic charm and modern amenities, as evident in the photos available online. The school’s facilities include state-of-the-art classrooms, well-equipped laboratories, and spacious libraries that cater to the academic needs of students. The athletic fields and gyms are hubs for sports and physical activities, showcasing the school’s emphasis on holistic development. Photos of the auditorium and performing arts spaces highlight the vibrant cultural life, with students engaging in music, drama, and art programs. The campus also features outdoor spaces, such as courtyards and picnic areas, where students can relax and socialize. Sustainability efforts, like solar panels and green spaces, are also visible in the imagery, reflecting the school’s commitment to environmental stewardship. These photos provide a glimpse into the dynamic and inclusive learning environment that Manual High School offers.

Denver Manual High School

Denver Manual High School empowers students to embrace their potential and thrive in a dynamic environment. Home of the Rams, the school is known for its vibrant campus life, academic excellence, and strong community ties. Photos highlight the school’s commitment to fostering growth and inclusivity, showcasing student achievements and memorable events like the Branded Arts Festival.

Denver Manual High School Overview

Denver Manual High School is a vibrant educational institution located at 1700 East 28th Ave, Denver, CO 80205. With a rich history and commitment to excellence, the school empowers students to achieve their full potential. Known as the “Home of the Rams,” Manual High School fosters a strong sense of community and pride. The campus is equipped with modern facilities that support academic and extracurricular activities. Photos of the school highlight its dynamic student life, including events like the Multicultural Fair and the Branded Arts Festival. Principal Nick Dawkins has been a key figure in shaping the school’s vision, though his recent resignation has sparked discussions about the school’s future. Alumni and current students actively contribute to the school’s legacy through reunions and club activities. Manual High School’s dedication to inclusivity and student success is evident in its programs and celebrations.

Photos of Denver Manual High School Campus

The campus of Denver Manual High School, located at 1700 East 28th Ave, is a hub of activity and learning. Photos capture the school’s modern facilities, including classrooms, sports fields, and auditoriums. The campus is adorned with vibrant murals and banners showcasing the school’s spirit. Images of the football field highlight the Rams’ athletic achievements, while shots of the hallways reflect the diversity and energy of the student body. The campus also features spaces for arts and culture, such as the areas where the Branded Arts Festival takes place. Photos of the school’s entrance, with its iconic logo, symbolize pride and identity. The campus serves as a backdrop for student life, from everyday activities to special events, offering a glimpse into the heart of Denver Manual High School’s community.

Student Life and Activities in Photos

Photos of student life at Denver Manual High School reveal a vibrant and engaged community. From spirited pep rallies to dynamic club events, students actively participate in various activities. The Multicultural Fair is a highlight, showcasing diverse traditions through music, dance, and art. Sports teams, like the Rams football team, are captured in action, while students in the arts program express their creativity. Clubs and organizations, such as the Math Cafe and Computer Science groups, demonstrate academic and extracurricular excellence. Spirit Week festivities and Red Rocks Community events further emphasize the school’s unity and pride. These photos provide a comprehensive view of the daily experiences and achievements of Manual High School students, reflecting their growth and camaraderie both inside and outside the classroom.

duPont Manual High School

duPont Manual High School photos highlight its rich traditions, academic excellence, and vibrant student life, showcasing a supportive community dedicated to fostering student potential and celebrating diversity.

duPont Manual High School Overview

duPont Manual High School is renowned for its strong academic programs and vibrant student community. Located in Louisville, Kentucky, the school emphasizes excellence in STEM, arts, and athletics;
It proudly supports diversity, with initiatives celebrating Black students, families, and staff, reflecting its commitment to inclusivity.
The school’s campus is dynamic, featuring state-of-the-art facilities that foster learning and creativity.
Students engage in various extracurricular activities, from robotics to music, showcasing their talents.
Notable events include the annual graduation ceremony at Freedom Hall, highlighting student achievements.
duPont Manual High School empowers students to thrive academically and personally, preparing them for future success.
Its dedication to fostering potential and celebrating diversity makes it a standout institution.

Photos of duPont Manual High School Campus

The campus of duPont Manual High School is a blend of modern facilities and historic charm. Photos capture the school’s iconic architecture, including its main building and outdoor spaces.
The campus features state-of-the-art classrooms, labs, and auditoriums, providing students with a conducive learning environment.
Landmarks like the school’s logo, adorned with a Thunderbolt symbol, are prominently displayed in images.
The campus buzzes with activity, from students collaborating in outdoor courtyards to athletes training on sports fields.
Photos also highlight the school’s commitment to arts and culture, with vibrant murals and event spaces.
The campus serves as a backdrop for memorable moments, including Spirit Week, the Multicultural Fair, and the Branded Arts Festival.
These images showcase the school’s dynamic atmosphere and dedication to fostering creativity and excellence.

Student Achievements and Events in Photos

Photos from duPont Manual High School highlight exceptional student achievements and vibrant events.
Graduation ceremonies feature seniors tossing their caps, celebrating their accomplishments.
Sports teams, like the Thunderbolts, are captured in action, showcasing their determination and teamwork.
The Multicultural Fair and Spirit Week are prominently displayed, emphasizing diversity and school pride.
Events such as the Branded Arts Festival and student club activities are documented, reflecting creativity and community involvement.
Achievements in academics, arts, and athletics are celebrated through images that inspire and motivate.
These photos encapsulate the spirit of excellence and unity at duPont Manual High School.

Photos from School Events

Photos from school events showcase the vibrant spirit of Manual High School.
Graduation ceremonies, sports events, and the Multicultural Fair highlight student achievements and community engagement.
The Branded Arts Festival and Spirit Week are also prominently featured.

Graduation Ceremonies Photos

Graduation ceremonies at Manual High School are moments of pride and celebration.
Photos capture students tossing caps, receiving diplomas, and sharing joy with families.
The 170th commencement of duPont Manual High School, held at Freedom Hall, showcased students’ achievements.
Seniors from Manual High School in Denver were photographed throwing their caps in the air, marking their milestone.
These images highlight the school’s commitment to student success and community support.
Graduation photos are widely shared on platforms like Facebook and the school’s website, preserving memories for alumni and families.
Principal Nick Dawkins and faculty members are often seen congratulating graduates, emphasizing the school’s dedication to student growth.
These photos serve as timeless reminders of the hard work and dedication that lead to this special day.

Sports and Athletics Photos

Sports and athletics at Manual High School are a cornerstone of student life.
Photos capture the excitement of football, basketball, and other sports events.
The school’s teams, like the Rams, are often featured in action shots.
The Denver Broncos gifted new helmets to Manual’s football team, highlighting community support.
Student-athletes are celebrated for their dedication and teamwork.
These images showcase the school’s athletic achievements and school spirit.
They are shared widely on social media platforms like Instagram and Facebook.
The photos also highlight the school’s commitment to fostering physical and mental growth.
Athletics at Manual High School play a vital role in shaping well-rounded individuals.

Multicultural Fair and Other Events

The Multicultural Fair at Manual High School is a vibrant celebration of diversity.
Photos capture students, teachers, and the community coming together to honor different cultures.
The event features traditional performances, food, and exhibits showcasing global traditions.
These images highlight the school’s commitment to inclusivity and cultural exchange.
Other events, like the Branded Arts Festival, also appear in photos, blending art and education.
Student Life Photo Galleries include moments from Spirit Week and the Red Rocks Community event.
These gatherings foster unity and pride among attendees.
The fair and other events are widely shared on social media platforms.
They serve as a testament to the school’s dynamic and inclusive environment.
The photos reflect the joy and creativity of these celebrations.

Social Media and Photo Galleries

Manual High School’s photos are widely shared across Instagram, Facebook, and the school’s official website.
These platforms feature updates, event highlights, and student achievements.
Galleries showcase campus life, sports, and cultural events.
Followers can explore vibrant imagery and stay connected to school activities.

Instagram Photos and Updates

Manual High School’s Instagram page is a vibrant hub showcasing student life, achievements, and campus activities.
Recent posts highlight the Branded Arts Festival, featuring colorful murals and student artistry.
Photos of the football team receiving new helmets, gifted by the Denver Broncos, have garnered significant engagement.
The page also shares updates on academic successes, such as the Math Cafe and Computer Science initiatives.
Followers can explore snapshots from the Multicultural Fair, capturing the diversity and spirit of the school community.
Principal Nick Dawkins occasionally shares personal reflections, offering insights into school leadership.
The Instagram feed is a dynamic way to stay connected with Manual High School’s events and student accomplishments.

Facebook Photos and Albums

Manual High School’s Facebook page offers a comprehensive collection of photos and albums, capturing key moments in school life.
The profile and cover photos feature the school’s logo and vibrant campus scenes.
Albums are organized by events, such as graduation ceremonies, sports games, and the Multicultural Fair.
Recent updates include photos from Spirit Week and the Class of 2025’s milestones.
The page also shares snapshots of student clubs, academic achievements, and community engagements.
Facebook albums provide a detailed visual narrative of the school’s activities and traditions.
Followers can explore photos from past years, showcasing the evolution of Manual High School’s programs and events.
The platform serves as a valuable resource for students, parents, and alumni to stay connected and celebrate shared experiences.

Photo Galleries on the School Website

The official website of Manual High School features extensive photo galleries that beautifully capture the essence of student life and school events.
These galleries are meticulously organized, covering a wide range of activities such as graduation ceremonies, sports competitions, and the Multicultural Fair.
Visitors can explore vibrant images from the Fall 2022-23 school year, including the Winter Showcase, Math Cafe, and Redrocks Community events.
The galleries also highlight academic achievements, student clubs, and community engagements, providing a glimpse into the school’s dynamic environment.
Additionally, the website showcases photos of the school’s logo, symbolic imagery, and notable figures like Principal Nick Dawkins.
The galleries are regularly updated, ensuring that families, alumni, and prospective students can stay connected to Manual High School’s traditions and milestones.

Notable Photos and Stories

Manual High School features iconic photos of the Branded Arts Festival, Principal Nick Dawkins, and the school’s symbolic logo with its meaningful design.
These images highlight the school’s culture and legacy.

Photos of the Branded Arts Festival

The Branded Arts Festival at Manual High School is a vibrant celebration of creativity and talent, captured through stunning photos. The event, held from April 28 to May 1, 2025, features murals, live performances, and interactive art installations. Principal Nick Dawkins kicked off the festival, emphasizing its importance in fostering student expression. Photos highlight the colorful murals created by students and guest artists, as well as the lively atmosphere with music and dance performances. The festival also includes workshops where students can learn various art techniques. These images showcase the school’s commitment to nurturing creativity and providing a platform for self-expression. The Branded Arts Festival has become a beloved tradition, uniting students, teachers, and the community through art. The photos truly encapsulate the spirit of this inspiring event.

Photos of the School Logo and Symbolism

Photos of Manual High School’s logo and symbolism highlight the iconic “M” with a thunderbolt, embodying strength and resilience. This logo is a proud representation of the school’s identity and is prominently displayed on campus buildings, sports jerseys, and merchandise. The imagery captures the logo’s bold design, often set against vibrant backgrounds or integrated into school spirit wear. The thunderbolt symbolizes energy and determination, reflecting the school’s commitment to excellence. Photos also show the logo during events like graduation ceremonies and sports games, where it serves as a unifying emblem for students, alumni, and staff. The logo’s presence in various formats, from banners to digital displays, underscores its significance in school culture. These visuals evoke a sense of pride and belonging, celebrating Manual High School’s legacy and values.

Photos of Principal Nick Dawkins

Photos of Principal Nick Dawkins capture his leadership and dedication to Manual High School. Images show him at school events, including graduation ceremonies and student gatherings, where his presence embodies school spirit. Dawkins, known for his charismatic approach, is often seen interacting with students, staff, and parents, highlighting his commitment to fostering a supportive environment. His resignation announcement drew significant attention, with photos reflecting the emotional impact on the school community. Dawkins’ photos also showcase his involvement in initiatives like the Branded Arts Festival and sports events, where he cheered on the Thunderbolts. These visuals underscore his role as a unifying figure and his influence on shaping the school’s culture. Dawkins’ legacy is preserved in these images, symbolizing his contributions to Manual High School’s growth and identity.

Student and Alumni Contributions

Student and alumni contributions at Manual High School are highlighted through photos of club activities, volunteer efforts, and reunions, demonstrating their creativity and dedication to the community and achievements.

Photos from Student Clubs and Organizations

Photos from student clubs and organizations at Manual High School highlight the diverse range of extracurricular activities and student involvement. Clubs such as robotics, debate, and art clubs showcase creativity and collaboration. Spirit Week events, multicultural fairs, and volunteer projects are captured in vibrant images, reflecting the school’s commitment to fostering community and inclusivity. The Branded Arts Festival and student-led initiatives also feature prominently, demonstrating the students’ artistic talents and dedication. These photos provide a glimpse into the dynamic student life, where clubs and organizations play a vital role in shaping well-rounded individuals. The imagery underscores the school’s emphasis on teamwork, innovation, and cultural exchange, offering a visual narrative of student achievements and shared experiences. Through these photos, Manual High School celebrates the unique contributions of its students and their impact on the community.

Alumni Photos and Reunion Events

Alumni photos and reunion events at Manual High School capture the enduring spirit of the school’s community. Reunions bring together graduates from various decades, celebrating shared memories and milestones. Photos from these gatherings showcase the pride and nostalgia of alumni reconnecting with former classmates and teachers. Milestone events, such as the 170th commencement, highlight the school’s rich history and its impact on generations of students. The Multicultural Fair and other alumni-driven initiatives are also documented, reflecting the school’s commitment to fostering lifelong connections. Principal Nick Dawkins’ resignation mid-year further underscores the evolving narrative of the school’s leadership and its continued dedication to student success. These photos serve as a testament to the strong bonds and lasting legacy of Manual High School’s alumni community.

PDF

blumberg lease agreement pdf free

The Blumberg Lease Agreement PDF offers a reliable‚ legally binding document for landlords and tenants‚ providing clarity and comprehensiveness in outlining rental terms and conditions.

1.1 Overview of the Blumberg Lease Agreement

The Blumberg Lease Agreement is a comprehensive legal document designed to outline the terms and conditions between landlords and tenants. It covers essential details such as rent‚ lease duration‚ maintenance responsibilities‚ and termination clauses. Available in plain English‚ this agreement ensures clarity and mutual understanding for both parties. It is suitable for various types of properties‚ including apartments‚ houses‚ and commercial spaces‚ making it a versatile and widely used template in the real estate industry.

1.2 Importance of Using a Lease Agreement

Using a lease agreement is essential for both landlords and tenants to establish clear expectations and protect their rights. It ensures legal compliance‚ outlines payment terms‚ and defines responsibilities for property maintenance. A well-drafted lease agreement minimizes disputes by providing a written record of the rental terms. It also offers protection in case of breaches‚ such as unpaid rent or property damage. By using a lease agreement‚ both parties can avoid misunderstandings and ensure a fair‚ legally binding arrangement that addresses all aspects of the tenancy.

1.3 Benefits of Using a Free PDF Template

Using a free PDF template for a Blumberg Lease Agreement offers numerous advantages. It provides an accessible and cost-effective solution for creating a legally binding document. The template is easy to download and fill out‚ saving time and effort. It also ensures that all necessary clauses and details are included‚ reducing the risk of oversights. Additionally‚ the PDF format is widely compatible and can be easily shared‚ edited‚ and printed. This makes it a practical choice for both landlords and tenants seeking a straightforward and efficient leasing process.

Types of Blumberg Lease Agreements

Blumberg Lease Agreements cater to various property types‚ including residential‚ commercial‚ condominium‚ apartment‚ and house leases‚ ensuring tailored solutions for diverse rental needs and legal requirements.

2.1 Residential Lease Agreements

A residential lease agreement is a binding contract between a landlord and tenant for renting a residential property. Blumberg offers comprehensive and plain English versions‚ ensuring clarity and mutual understanding. These agreements cover key terms such as rent amount‚ lease duration‚ maintenance responsibilities‚ and termination clauses. They are suitable for both furnished and unfurnished properties‚ providing flexibility for various rental situations. Blumberg’s residential lease agreements are widely recognized for their thoroughness and ease of use‚ making them a trusted choice for landlords and tenants alike.

2.2 Commercial Lease Agreements

Blumberg’s commercial lease agreements are tailored for business rentals‚ offering detailed terms to protect both landlords and tenants. These documents cover rent‚ lease duration‚ property use‚ and maintenance responsibilities. They are drafted in plain English‚ ensuring clarity and mutual understanding. Commercial agreements often include specific clauses related to business operations‚ insurance‚ and liability. Blumberg’s forms are customizable‚ making them adaptable to various commercial settings‚ from office spaces to retail stores. They provide a cost-effective and efficient solution for establishing clear rental terms in a business context.

2.3 Condominium Lease Agreements

Blumberg’s condominium lease agreements are specifically designed for leasing condo units‚ offering detailed terms to ensure clarity and fairness. These documents‚ such as forms 101 and 102‚ are prepared by legal experts like Arnold Mandell and Adam Leitman Bailey‚ providing comprehensive coverage. They outline rent‚ maintenance responsibilities‚ and use of common areas. Drafted in plain English‚ these agreements are easy to understand and customize. They are suitable for both furnished and unfurnished properties‚ ensuring a smooth rental process for both landlords and tenants in condominium settings.

2.4 Apartment Lease Agreements

Blumberg’s apartment lease agreements are tailored for urban rentals‚ offering clear and balanced terms for landlords and tenants. Form 326 provides moderate coverage‚ while others offer comprehensive details. These documents cover rent‚ utilities‚ and maintenance responsibilities‚ ensuring mutual understanding. Drafted in plain English‚ they are customizable and suitable for both furnished and unfurnished apartments. Blumberg’s forms ensure compliance with local laws‚ providing a reliable framework for a secure and hassle-free rental experience in apartment settings.

2.5 House Lease Agreements

Blumberg’s house lease agreements are designed to cover all aspects of renting a house‚ ensuring clarity and legal compliance. These PDF forms provide detailed terms‚ including rent‚ security deposits‚ and maintenance responsibilities. Drafted in plain English‚ they are easy to understand and customize. Suitable for both furnished and unfurnished properties‚ these agreements highlight landlord and tenant obligations‚ offering a balanced and comprehensive framework for a secure rental arrangement. They are ideal for landlords and tenants seeking a clear‚ legally sound house lease agreement.

Key Features of the Blumberg Lease Agreement

The Blumberg Lease Agreement PDF offers comprehensive terms‚ plain English drafting‚ customizable fields‚ and suitability for furnished or unfurnished properties‚ ensuring clarity and legal compliance.

3.1 Comprehensive Terms and Conditions

The Blumberg Lease Agreement PDF includes detailed terms covering rent‚ security deposits‚ maintenance responsibilities‚ and termination clauses. It ensures both parties understand their obligations and rights‚ providing a clear framework for resolving disputes. The document is drafted in plain English‚ making it accessible and reducing legal jargon. This comprehensive approach helps prevent misunderstandings and ensures compliance with local laws‚ protecting both landlords and tenants legally. Its thoroughness makes it a trusted tool for establishing a fair and binding rental agreement.

3.2 Plain English Drafting

The Blumberg Lease Agreement is drafted in plain English‚ ensuring clarity and accessibility for both landlords and tenants. This approach avoids complex legal jargon‚ making it easier for all parties to understand their obligations and rights. The straightforward language helps prevent disputes by providing clear‚ unambiguous terms. This drafting style ensures that the agreement is not only legally binding but also user-friendly‚ fostering mutual understanding and reducing the likelihood of misunderstandings. It’s designed to be fair and enforceable while remaining accessible to everyone involved.

3.3 Customizable Fields

The Blumberg Lease Agreement PDF offers customizable fields‚ allowing users to tailor the document to their specific needs. These fields enable landlords and tenants to input detailed information‚ such as rent amounts‚ lease durations‚ and property specifics. The flexibility of these fields ensures that the agreement can be adapted for various types of properties‚ including residential‚ commercial‚ or furnished units. This feature streamlines the process of creating a personalized and legally binding contract‚ saving time and ensuring all terms are clearly outlined. Customization promotes accuracy and relevance‚ making the agreement more effective for all parties involved.

3.4 Suitable for Furnished or Unfurnished Properties

The Blumberg Lease Agreement PDF is versatile‚ accommodating both furnished and unfurnished properties. For furnished units‚ it details inventory lists and condition assessments‚ ensuring clear expectations. For unfurnished properties‚ it focuses on structural responsibilities and tenant obligations. This adaptability makes the document equally effective for different rental scenarios‚ providing a solid framework regardless of the property’s condition. The agreement’s flexibility ensures that all aspects of the rental arrangement are covered‚ offering peace of mind for landlords and tenants alike in any situation.

How to Download and Use the Blumberg Lease Agreement PDF

Download the Blumberg Lease Agreement PDF from trusted sources like the Blumberg website or legal platforms. Fill in the fields‚ customize as needed‚ and save or print for use.

4.1 Steps to Download the PDF Form

To download the Blumberg Lease Agreement PDF‚ visit the official Blumberg website or trusted legal document platforms. Navigate to the “Lease Agreements” section and select the desired form. Click the “Download” button to access the PDF. Ensure the source is reliable to avoid unauthorized versions. Once downloaded‚ review the document to confirm it meets your needs; This straightforward process provides quick access to a professional lease template‚ saving time and effort in drafting a rental agreement from scratch.

4.2 How to Fill Out the Lease Agreement

Filling out the Blumberg Lease Agreement PDF requires careful attention to detail. Start by entering the landlord’s and tenant’s personal information‚ including names and addresses. Specify the rental property details‚ such as the address and whether it is furnished or unfurnished. Outline the lease terms‚ including the rent amount‚ payment methods‚ and due dates. Include security deposit details and any specific rules or restrictions. Customize the document by adding or modifying clauses as needed to suit your situation. Ensure both parties review and sign the agreement before finalizing it.

4.3 Editing and Customizing the Document

Customizing the Blumberg Lease Agreement PDF is straightforward‚ allowing users to tailor the document to their specific needs. Utilize fillable fields to input details such as rent amount‚ lease duration‚ and security deposit terms. Additional clauses or rules can be added to address unique circumstances. The document is designed to be edited easily‚ ensuring it aligns with local laws and regulations. For added convenience‚ users can access and modify the PDF online‚ making it simple to create a personalized and legally binding agreement.

4.4 Saving and Printing the Agreement

Once the Blumberg Lease Agreement PDF is customized‚ it can be easily saved as a secure PDF file for future reference. Users can export the document in various formats‚ such as Word or other editable files‚ for further modifications. Printing the agreement is straightforward‚ ensuring a professional and clear hard copy. Both digital and printed versions should be securely stored‚ with signed copies distributed to all parties involved. This ensures transparency and serves as a legally binding record for both landlords and tenants.

Legal Considerations for Blumberg Lease Agreements

Blumberg Lease Agreements must align with local laws‚ ensuring clarity on security deposits‚ rent payments‚ and termination clauses to protect both landlords and tenants legally.

5.1 Security Deposit Terms

The Blumberg Lease Agreement PDF includes specific provisions for security deposits‚ ensuring they are refundable if the tenant meets all lease conditions. It outlines the process for returning deposits‚ deductions for damages or unpaid rent‚ and compliance with local laws. This section protects both parties by clearly defining the terms under which the deposit is held and returned‚ ensuring transparency and legal compliance. Proper documentation is essential to avoid disputes and ensure fair treatment of the security deposit.

5.2 Rent Payment and Late Fees

The Blumberg Lease Agreement PDF clearly outlines rent payment terms‚ including the amount‚ due date‚ and accepted payment methods. It also specifies late fee policies‚ ensuring both parties understand the consequences of delayed payments. This section helps prevent disputes by providing a clear framework for rent collection and late fee enforcement. Transparent terms ensure fairness and accountability‚ protecting both landlords and tenants. Proper documentation of payment details is essential for maintaining a smooth rental relationship.

5.3 Maintenance and Repair Responsibilities

The Blumberg Lease Agreement PDF clearly outlines the responsibilities for maintenance and repairs‚ ensuring both landlord and tenant understand their obligations. It specifies that tenants must maintain the property in good condition‚ report damages promptly‚ and handle minor repairs. Landlords are typically responsible for structural repairs and essential systems. The agreement also covers utility responsibilities‚ ensuring clarity on who handles services like water‚ electricity‚ and trash. This section helps prevent disputes by clearly defining roles and expectations for property upkeep and necessary repairs.

5.4 Termination Clauses

The Blumberg Lease Agreement PDF includes detailed termination clauses‚ outlining the conditions under which either party can end the lease. It specifies required notice periods and scenarios for termination‚ such as breach of contract or mutual agreement. The document ensures clarity on how the lease can be legally terminated‚ protecting both landlord and tenant rights. These clauses prevent disputes by providing a clear framework for ending the tenancy under agreed-upon circumstances‚ ensuring a smooth transition when the lease concludes.

5.5 Compliance with Local Laws

The Blumberg Lease Agreement PDF ensures compliance with local laws‚ providing a legally sound framework for rental agreements. It is drafted to meet specific state and municipal regulations‚ ensuring all terms align with current legal standards; Regular updates reflect changes in landlord-tenant laws‚ making it a reliable choice for both parties. This compliance guarantees that the agreement is enforceable and protects the rights of both landlords and tenants‚ fostering a clear and mutually understood legal relationship.

Benefits for Landlords and Tenants

The Blumberg Lease Agreement PDF provides clarity‚ legal protection‚ and a time-saving solution for both landlords and tenants‚ ensuring mutual understanding and a cost-effective rental process.

6.1 Clarity and Mutual Understanding

The Blumberg Lease Agreement ensures both landlords and tenants fully comprehend their obligations‚ fostering a smooth rental process. Its plain English drafting eliminates legal jargon‚ making terms clear and accessible‚ while detailed sections on rent payments‚ property maintenance‚ and termination clauses provide a transparent framework. This clarity minimizes misunderstandings‚ ensuring both parties are aligned and informed‚ which is essential for a harmonious landlord-tenant relationship. The agreement’s straightforward language and comprehensive structure promote accountability and mutual respect‚ benefiting all involved.

6.2 Legal Protection for Both Parties

The Blumberg Lease Agreement ensures legal protection for both landlords and tenants by clearly outlining each party’s rights and responsibilities; Its comprehensive terms prevent disputes and provide enforceable solutions. The agreement covers key areas like rent payments‚ security deposits‚ and property maintenance‚ safeguarding interests while ensuring compliance with local laws. This legal framework offers peace of mind‚ protecting both parties from potential conflicts and financial losses‚ making it a reliable choice for secure rental agreements.

6.3 Time-Saving Solution

The Blumberg Lease Agreement PDF is a time-saving solution for landlords and tenants‚ offering a pre-drafted‚ customizable template that streamlines the rental process. Its plain English format and comprehensive structure eliminate the need for extensive legal drafting‚ allowing users to quickly create a legally binding document. With ready-to-use clauses and fillable fields‚ it saves valuable time while ensuring all essential terms are covered. This efficient tool simplifies the leasing process‚ enabling parties to finalize agreements swiftly and confidently.

6.4 Cost-Effective Option

The Blumberg Lease Agreement PDF is a cost-effective option for landlords and tenants‚ eliminating the need for expensive legal drafting services. Its pre-drafted‚ customizable template provides a professional and legally binding document at a fraction of the cost. Affordable and accessible‚ it allows users to create a comprehensive lease agreement without incurring high legal fees. This makes it an ideal choice for those seeking a budget-friendly solution to streamline their rental processes while maintaining clarity and legal compliance.

Additional Resources and Support

Blumberg offers additional legal forms‚ online platforms for lease management‚ and professional legal advice to ensure comprehensive support for landlords and tenants.

7.1 Where to Find More Legal Forms

Blumberg offers a wide range of legal forms on their official website‚ including lease agreements‚ rental applications‚ and eviction notices. Additionally‚ trusted platforms like FormsPals and legal document services provide access to customizable templates. These resources ensure landlords and tenants can easily find and download necessary forms‚ including fillable PDFs and state-specific documents. Professional legal websites and libraries also offer comprehensive guides and templates to streamline the leasing process.

7.2 Online Platforms for Lease Agreement Management

Several online platforms simplify lease agreement management‚ offering tools for editing‚ signing‚ and storing documents digitally. Websites like pdfFiller and FormsPals provide fillable PDF templates‚ enabling users to customize and download forms quickly. Additionally‚ Blumberg’s official website offers a range of legal forms‚ including lease agreements‚ with options for digital signatures and cloud storage. These platforms ensure efficient document management‚ making it easier for landlords and tenants to handle agreements remotely and maintain organized records.

7.3 Professional Legal Advice

While the Blumberg Lease Agreement PDF is a comprehensive template‚ it is recommended to seek professional legal advice to ensure it meets specific legal requirements and suits your situation. Attorneys can review and customize the agreement to address unique circumstances‚ such as local regulations or special clauses. This ensures compliance with the law and protects both parties’ interests. Legal experts can also provide guidance on dispute resolution and enforcement of terms‚ offering peace of mind for landlords and tenants alike.

PDF

happy birthday score pdf

The “Happy Birthday to You” song, written by Patty Hill and Mildred J. Hill, is a globally recognized melody celebrating birthdays worldwide. Its simplicity and universality have made it a cultural phenomenon, transcending languages and traditions. The Happy Birthday Score PDF provides an accessible format for musicians to play this iconic tune, ensuring its legacy endures through generations. Whether for personal celebrations or educational purposes, the PDF sheet music remains a timeless resource for music lovers of all skill levels.

1.1 Historical Background of “Happy Birthday to You”

“Happy Birthday to You,” written by sisters Patty Hill and Mildred J. Hill in the early 20th century, originated as a classroom greeting song titled “Good Morning to All.” Over time, it evolved into the birthday anthem we know today. Its widespread popularity led to its copyright being owned by Summy-Birchard Music in 1935, later acquired by Warner/Chappell Music. However, in 2015, the song entered the public domain in the United States, freeing it for universal use without copyright restrictions. This historic transition has made it accessible to people worldwide, cementing its status as a cultural treasure.

1.2 Cultural Significance of the Song

“Happy Birthday to You” holds profound cultural significance as the most recognized song worldwide, transcending linguistic and cultural barriers. Its simple melody and universal theme of celebration have made it a staple in birthday traditions across the globe. The song’s adaptability to various musical styles and languages has further solidified its place in global culture. Its presence in films, advertisements, and public events highlights its enduring appeal. As a symbol of joy and togetherness, it continues to unite people, making it an integral part of shared human experiences and a testament to the power of music to connect diverse cultures.

1.3 Importance of Sheet Music in Music Education

Sheet music is a foundational tool in music education, providing a visual representation of melodies, harmonies, and rhythms. It enables learners to understand musical notation, develop sight-reading skills, and grasp theoretical concepts. For “Happy Birthday,” sheet music simplifies the learning process, especially for beginners, by breaking down the song into manageable parts. Educators use it to teach chord progressions, tempo, and dynamics, fostering musical literacy. Its accessibility across instruments and skill levels makes it a versatile resource for both individual practice and classroom instruction, ensuring that musical knowledge is preserved and passed on effectively.

Composition and Structure of Happy Birthday

The “Happy Birthday” melody is simple, harmonically rich, and universally recognized. Its structure features catchy lyrics, a standard tempo, and basic chord progressions, making it timeless and accessible.

2.1 Melody and Harmony

The melody of “Happy Birthday to You” is remarkably simple yet memorable, featuring a distinctive rise and fall in pitch. The harmony is equally straightforward, typically using primary chords like C, G, and Am, which contribute to its universal appeal. These elements make the song easy to sing and play, ensuring it remains a beloved choice for celebrations worldwide. The structure allows for harmonization while maintaining its original charm, making it adaptable across various musical styles and arrangements. This simplicity is a key factor in its enduring popularity.

2.2 Lyrics and Their Meaning

The lyrics of “Happy Birthday to You” are simple yet deeply meaningful, expressing joy and goodwill. The song traditionally consists of three verses, each with four lines, celebrating the occasion with cheerful words. The famous opening line, “Happy birthday to you,” sets a tone of celebration and togetherness. The repetition of the phrase emphasizes unity and shared happiness. The lyrics are universal, transcending cultural and linguistic barriers, making the song a global anthem for birthday celebrations. Their heartfelt and inclusive nature ensures they resonate with people of all ages and backgrounds, solidifying the song’s enduring appeal.

2.3 Tempo and Time Signature

The “Happy Birthday to You” melody is typically performed in a 4/4 time signature, with a moderate tempo of around 96 beats per minute. This common time structure makes the song easy to follow and sing along to, contributing to its universal appeal. The steady rhythm allows for straightforward harmonization and arrangement, ensuring the melody remains recognizable in various interpretations. The tempo and time signature are key elements that maintain the song’s upbeat and celebratory feel, making it suitable for diverse performances and arrangements, from simple piano accompaniments to grand orchestral renditions.

2.4 Chord Progressions

The chord progressions in “Happy Birthday to You” are simple and iconic, typically following a C Major scale. The basic progression is C ⎼ G ⸺ Am ⎼ F, repeating for each verse. These chords provide a cheerful and familiar harmonic structure, making the song easy to accompany on instruments like piano or guitar. Variations, such as jazz interpretations, may incorporate extended chords like Cmaj7 or G7, adding complexity. The chord progressions remain consistent across different arrangements, ensuring the melody’s recognizable and joyful character is preserved in every performance.

Arrangements and Versions of Happy Birthday

The song is available in diverse arrangements, including piano, vocal with guitar chords, instrumental versions, and choir formats. PDF sheet music offers versatility for all skill levels, ensuring accessibility and emotional connection across performances.

3.1 Piano Arrangements

Piano arrangements of “Happy Birthday to You” are widely available in PDF format, catering to musicians of all skill levels. From simple melodies for beginners to intricate jazz interpretations, these arrangements offer versatility. Many versions include chord progressions, allowing for harmonized performances. Some scores feature note letters, making it easier for novices to learn. Intermediate players can explore more complex compositions, such as the “Happy Birthday Rag,” which adds a lively twist. Whether for personal practice or public performance, piano arrangements ensure the song remains a beloved and accessible celebration staple, preserving its cultural significance across generations.

3.2 Vocal and Guitar Chords

Vocal and guitar chord arrangements of “Happy Birthday to You” are popular for their simplicity and versatility. Sheet music PDFs often include chord progressions in various keys, such as A, Bb, C, and D Major, making it easy for vocalists and guitarists to perform. These arrangements frequently offer transposition options, allowing adaptation to different vocal ranges or instrumental preferences. Many versions include lyrics and chord symbols, ensuring clarity for both beginners and experienced musicians. Additionally, some scores provide MIDI files for practice or accompaniment. This format enables performers to customize the song for intimate gatherings or larger celebrations, maintaining its timeless appeal and accessibility.

3.3 Instrumental Versions

Instrumental versions of “Happy Birthday to You” offer a diverse range of interpretations, catering to various musical preferences. These arrangements are available in PDF format for instruments like piano, flute, clarinet, and cello. Many scores feature jazz improvisations, classical renditions, or even ragtime styles, adding a unique twist to the familiar melody. Some versions include duets or ensemble arrangements, perfect for collaborative performances. Additionally, instrumental sheets often provide detailed notation, making them suitable for both educational purposes and professional gigs. This variety ensures that musicians can personalize the song to suit different occasions and audiences, keeping it fresh and engaging.

3.4 Choir Arrangements (SATB)

Choir arrangements of “Happy Birthday to You” in SATB (Soprano, Alto, Tenor, Bass) format bring harmony and depth to the classic melody. These arrangements, available in PDF, are perfect for group performances, blending voices in rich harmonies. Many versions include piano accompaniment, while others are a cappella. Arrangers like Bernard Dewagtere have created SATB scores that balance simplicity with musicality, making them accessible for choirs of all levels. These arrangements are ideal for birthdays, community events, or worship services, offering a joyful and engaging way to celebrate with shared song. The SATB format ensures everyone can participate, creating a memorable experience for both singers and audiences.

3.5 Jazz Interpretations

Jazz interpretations of “Happy Birthday to You” offer a fresh, creative twist on the classic melody. These arrangements often feature improvisation, syncopation, and blue notes, giving the song a sophisticated, modern feel. Musicians can explore complex harmonies and rhythms while maintaining the tune’s recognizable charm. PDF sheet music for jazz versions, such as Stefan Braun’s “Happy Birthday Rag,” provides pianists and instrumentalists with detailed notation for dazzling performances. Whether for a birthday celebration or a professional gig, jazz arrangements add a unique and stylish touch to this beloved song, appealing to both traditional and contemporary audiences alike.

3.6 Simple Arrangements for Kids

Simple arrangements of “Happy Birthday to You” are perfect for introducing children to music. These versions often feature easy-to-read sheet music in keys like C Major, with large notes and basic chord progressions. Lyrics are included for singing along, making it interactive and fun. Many PDFs are designed for young learners, with visual aids like hand positions for piano or finger placements for recorder. These arrangements are ideal for classroom activities or home practice, helping kids develop musical skills while celebrating special occasions. Free downloadable versions, such as those from Capotasto Music, make it accessible for educators and parents to teach music basics in an engaging way.

How to Download and Print Happy Birthday Score PDF

Visit popular sheet music websites like Virtual Sheet Music or Musescore to download the PDF. Select your preferred arrangement, then print it on standard paper for easy use.

4.1 Popular Websites for Sheet Music

Popular websites for downloading Happy Birthday sheet music include Virtual Sheet Music, Musescore, and Etsy. These platforms offer high-quality PDF scores, often with multiple arrangements. Virtual Sheet Music provides interactive features, while Musescore offers a wide range of versions, including piano, vocal, and instrumental. Etsy features unique, professionally arranged scores, ideal for special performances. Additionally, websites like Capotasto Music and Michael Kravchuk’s site offer free and easy-to-download PDFs, catering to both beginners and advanced musicians. These sites ensure accessibility and variety for celebrating birthdays musically.

4.2 Step-by-Step Download Guide

To download the Happy Birthday score PDF, visit a reliable sheet music website like Virtual Sheet Music or Musescore. Search for “Happy Birthday” in the search bar and select the desired arrangement. Choose the version that suits your needs, such as piano, vocal, or instrumental. Click the “Download” button and follow the prompts to complete the purchase or free download. Create an account if required, then access your download. Save the PDF to your device and print it for use. Ensure the file is compatible with your software for easy access and performance.

4.3 Tips for Printing Sheet Music

For optimal printing of Happy Birthday sheet music, ensure your PDF is high-resolution and compatible with your printer. Use standard sheet music paper size (8.5×11 inches) for clarity. Adjust printer settings to “Actual Size” to avoid scaling issues. Select a high-quality print mode for crisp notes and lyrics. Check margins to prevent text or notes from being cut off. For best results, use bright white paper to enhance readability. If printing for performance, consider duplex printing for multi-page scores. Save a digital copy as a backup and ensure your printer is well-aligned before printing. This ensures professional-quality sheet music for all users.

Benefits of Using Happy Birthday Sheet Music

Using Happy Birthday sheet music enhances music education, fosters creativity, and provides emotional connection during celebrations. It is versatile for various skill levels and performance settings, making it universally accessible and enjoyable.

5.1 Educational Value

The Happy Birthday sheet music serves as an excellent educational tool, teaching melody, harmony, and rhythm. Its simplicity makes it ideal for beginners, helping them grasp basic musical concepts; The score introduces chord progressions, tempo, and notation, fostering a strong foundation in music theory. For intermediate learners, it offers opportunities to explore variations and improvisation. Additionally, the sheet music’s accessibility across instruments like piano, guitar, and choir promotes collaborative learning and ensemble performance. Its cultural significance also provides a rich context for understanding music history, making it a valuable resource for both students and educators alike.

5.2 Versatility in Performance

The Happy Birthday score PDF offers immense versatility, catering to diverse performance settings. From intimate gatherings to grand celebrations, the sheet music adapts seamlessly to various formats, including solo piano, vocal duets, and full choir arrangements. Its availability in multiple keys allows musicians to tailor the song to suit different vocal ranges and instrumental preferences. Additionally, the PDF’s flexibility enables performers to incorporate improvisation, jazz interpretations, or instrumental renditions, making it a dynamic choice for both traditional and contemporary performances. This adaptability ensures the song remains fresh and engaging across different audiences and cultural contexts;

5.3 Emotional Impact

The Happy Birthday score PDF carries profound emotional significance, evoking joy and togetherness during celebrations. Its familiar melody instantly connects people, creating heartfelt moments across generations. The sheet music serves as a bridge, allowing musicians to express emotions through performance, whether in intimate gatherings or grand events. Its universal appeal transcends cultural boundaries, making it a cherished part of personal and collective heritage; The song’s simplicity and warmth ensure its emotional resonance, fostering memories and unity wherever it is played.

5;4 Accessibility for All Skill Levels

The Happy Birthday score PDF is designed to cater to musicians of all skill levels, ensuring accessibility for everyone. Beginners can enjoy simplified arrangements, such as easy piano versions with basic chords, while intermediate players can explore more complex variations. The sheet music often includes multiple arrangements, such as vocal and guitar chords or SATB choir versions, allowing versatility for different performers. This inclusivity makes the song a universal favorite, enabling people of all musical backgrounds to participate and celebrate together. Its adaptability ensures that everyone, from kids to professionals, can enjoy playing or singing this beloved tune.

Advanced Techniques for Playing Happy Birthday

The song can be transformed into sophisticated performances using intricate chord progressions, improvisation, and key variations. Advanced techniques like ornamentation and embellishments allow musicians to personalize the melody, keeping it fresh and engaging while maintaining its nostalgic charm.

6.1 Advanced Chord Progressions

Advanced chord progressions elevate “Happy Birthday” beyond its simple melody, adding depth and sophistication. Techniques like extended chords, altered dominants, and modal interchange create intricate harmonies. For instance, substituting a vi chord with a vi7 or using ii-V-I progressions adds jazz flair. These advanced voicings can transform the song into a vibrant, modern piece while maintaining its recognizable core. Resources like PDF sheet music and MIDI files often include these complex arrangements, catering to skilled musicians seeking to innovate. Such progressions not only challenge players but also enrich the emotional impact of the melody, making it suitable for professional performances.

6.2 Improvisation Tips

Improvising over “Happy Birthday” can transform it into a dynamic performance. Start by experimenting with arpeggios or neighbor notes around the melody. Try substituting chords, such as using D7 instead of D for a bluesy feel. Incorporate jazz scales like the major pentatonic or blues scale to create solos. Vary rhythms by adding syncopation or triplets for complexity. Dynamics, like crescendos or decrescendos, can add emotional depth. For advanced players, modal interchange or reharmonization can reinvent the piece. Practice improvising over different chord progressions to expand your creativity. Listening to jazz versions of the song can also inspire new ideas and techniques to apply during your improvisation sessions.

6.3 Key Variations

Exploring key variations of “Happy Birthday” can enhance its musical appeal and adapt it to different vocal or instrumental ranges. Common keys include A, Bb, C, and D Major, each offering distinct tonal qualities. For simplicity, C Major is ideal for beginners, while Bb Major suits brass instruments. Jazz interpretations often use keys like G or F Major for a richer harmonic sound. Experimenting with keys like E or A Minor can create a melancholic twist. Key variations also allow the song to be tailored to specific vocal ranges or instrumental ensembles, ensuring versatility in performances across various musical settings and cultural contexts.

6.4 Ornamentation and Embellishments

Ornamentation and embellishments can elevate the simplicity of “Happy Birthday” into a more intricate and expressive piece. Trills, grace notes, and arpeggios add a decorative touch, while dynamic markings like crescendos or decrescendos enhance emotional depth. For advanced players, techniques such as mordents or turns can introduce a baroque-inspired flair. In jazz interpretations, syncopation and blue notes create a lively, improvisational feel. These embellishments allow performers to personalize the melody, making it unique to their style or the occasion. However, care should be taken to maintain the song’s recognizable core, ensuring the enhancements complement rather than overpower its timeless charm.

Popular Uses of Happy Birthday Sheet Music

Happy Birthday sheet music is widely used in birthday celebrations, educational settings, and professional performances. It’s also popular for choir arrangements and instrumental versions, suitable for all skill levels.

7.1 Birthday Celebrations

Happy Birthday sheet music is a cornerstone of birthday celebrations worldwide, offering a universal way to mark special occasions. Its simplicity and familiarity make it ideal for intimate gatherings, family events, or large parties. The sheet music is versatile, with arrangements available for piano, choir, or instrumental performances, catering to diverse musical preferences. Many versions, such as easy piano or SATB choir arrangements, ensure accessibility for all skill levels. Whether played by a professional or a beginner, the melody evokes joy and nostalgia, making it a timeless addition to birthday festivities. Its emotional impact unites people across cultures and generations.

7.2 Educational Settings

Happy Birthday sheet music plays a significant role in educational settings, serving as a valuable tool for music teachers and students. Its simple melody and familiar lyrics make it an ideal piece for teaching basic musical concepts like melody, harmony, and rhythm. Many educational institutions use the sheet music to introduce students to sight-reading, chord progressions, and ensemble playing. The availability of arrangements for various instruments and skill levels ensures accessibility for both beginners and advanced learners. Additionally, the song’s cultural significance provides opportunities to explore music history and cultural traditions, enriching the educational experience for students of all ages.

7.3 Professional Performances

Happy Birthday sheet music is widely used in professional performances, offering versatility for musicians across genres. High-quality digital sheet music in PDF format is favored by pianists, vocalists, and instrumentalists for its clarity and precision. Many professional performers utilize arrangements tailored for specific instruments or ensembles, such as SATB choir or jazz interpretations, to create unique renditions. The song’s universal appeal allows it to resonate with diverse audiences, making it a staple in concerts, corporate events, and public celebrations. Its adaptability ensures it remains a timeless piece in the repertoire of professional musicians, adapting to modern musical trends while maintaining its emotional impact.

The Future of Happy Birthday Score PDF

The Happy Birthday Score PDF will continue to evolve with digital advancements, offering interactive features and new arrangements. Its timeless appeal ensures it remains a beloved resource for musicians and celebrants alike.

8.1 Digital Evolution

The digital evolution of the Happy Birthday Score PDF is transforming how musicians access and interact with the sheet music. With advancements in technology, PDFs now offer interactive features such as transposition, instrument customization, and playback capabilities. Websites like Virtual Sheet Music and Musopen provide high-quality digital downloads, allowing users to print or use tablets for performance. Additionally, platforms like Synthesia offer MIDI versions for interactive learning. This digital shift ensures that the Happy Birthday Score remains accessible and engaging for future generations, adapting to the needs of modern musicians and educators.

8.2 New Arrangements and Interpretations

New arrangements and interpretations of the Happy Birthday Score PDF continue to emerge, offering fresh perspectives on the classic tune. From jazz improvisations to orchestral renditions, musicians worldwide reimagine the melody in diverse genres. Choir arrangements, such as SATB, add harmonic richness, while instrumental versions for piano, cello, and flute provide unique textures. These adaptations not only keep the song relevant but also cater to various skill levels and cultural preferences, ensuring its timeless appeal. The evolution of arrangements highlights the song’s versatility and its ability to resonate with audiences across generations and musical styles.

8.3 Cultural Evolution

The “Happy Birthday to You” song has undergone significant cultural evolution, becoming a universal symbol of celebration. Originally written in the late 19th century, it has been translated into numerous languages and adapted across cultures. Its simplicity and joyful melody have made it a staple in global birthday traditions; From classical performances to modern adaptations in movies and commercials, the song’s cultural impact is undeniable. Its transition into the public domain has further amplified its accessibility, allowing diverse interpretations and ensuring its enduring presence in global celebrations and musical heritage.

The “Happy Birthday to You” song, through its Happy Birthday Score PDF, remains a timeless and universally cherished melody. Its cultural significance, simplicity, and adaptability ensure its continued relevance across generations. The availability of sheet music in various formats has made it accessible to musicians of all skill levels, fostering musical appreciation and participation. As a cultural icon, it bridges traditions and languages, embodying joy and celebration worldwide. The Happy Birthday Score PDF not only preserves this beloved tune but also ensures its enduring legacy in personal and communal celebrations, making it an indispensable resource for music enthusiasts everywhere.

koolking air conditioner instruction manual

Welcome to the KoolKing Air Conditioner manual! This guide provides essential information for safe, efficient, and proper use of your air conditioner․ Read carefully to ensure optimal performance and safety․

1․1 Importance of Reading the Manual

Reading the KoolKing Air Conditioner manual is crucial for safe and proper use․ It provides essential safety precautions, installation guidelines, and operating instructions․ Understanding the features and functions ensures optimal performance and energy efficiency․ Failure to follow the manual may lead to improper usage, safety hazards, or damage to the unit․ Familiarize yourself with troubleshooting tips and maintenance routines to extend the lifespan of your air conditioner․ This manual is your guide to enjoying reliable cooling and heating while adhering to safety standards․

1․2 Key Features of the KoolKing Air Conditioner

The KoolKing Air Conditioner boasts advanced features for superior comfort and efficiency․ It offers cooling and heating modes, making it suitable for year-round use․ With inverter-driven technology, it ensures quiet operation and consistent temperature control․ The unit features multi-step air filtration, improving indoor air quality․ Its portable design with dual-hose functionality allows easy installation in various spaces․ Smart features include Wi-Fi connectivity and a remote control app for seamless operation․ Energy-efficient settings and an Eco-Friendly mode reduce power consumption, making it a reliable choice for modern households․

1․3 Safety Precautions Before Use

Before using your KoolKing Air Conditioner, read this manual carefully to ensure safe and proper operation․ Do not use the unit for purposes other than those described․ Avoid pulling or carrying the appliance by the power cord․ Keep the unit away from water and ensure it is placed on a stable, level surface․ Supervise children or individuals with limited knowledge or physical capabilities when using the appliance․ Always unplug the unit when not in use or during maintenance․ Follow all safety guidelines to prevent accidents and ensure optimal performance․

Safety Instructions for Proper Use

Adhering to safety guidelines is crucial for the proper use of your KoolKing Air Conditioner․ Always follow the instructions provided in this manual to ensure safe operation and optimal performance․

2․1 General Safety Guidelines

Always follow the safety guidelines provided in this manual to ensure safe operation of your KoolKing Air Conditioner․ Read the manual carefully before use and keep it for future reference․ Do not use the air conditioner for purposes other than those described․ Ensure proper supervision for children or individuals with limited experience․ Use the unit in the recommended room size and avoid pulling or carrying it by the power cord․ Regular maintenance and adherence to safety standards will help prevent accidents and ensure optimal performance․

2․2 Precautions for Installation and Maintenance

Before installing or maintaining your KoolKing Air Conditioner, ensure the area is clear of obstacles․ Always unplug the unit when performing maintenance or repairs․ Wear protective gear, such as gloves, to avoid injuries․ Avoid using damaged power cords or loose connections, as they may cause electrical hazards․ Properly handle refrigerants and ensure all fittings are secure to prevent leaks․ Follow the manufacturer’s guidelines for installation and maintenance to guarantee safety and efficiency․ If unsure, consult a qualified technician to avoid potential risks․

2․3 Electrical Safety Tips

Always use a grounded power outlet and ensure the voltage matches the unit’s requirements․ Avoid using extension cords or overloaded circuits․ Never touch electrical components with wet hands or while standing on a damp surface․ If the power cord is damaged, replace it immediately․ Do not modify or tamper with the electrical connections․ Keep children away from the power cord and electrical controls․ Turn off the unit and unplug it during maintenance or extreme weather conditions․ Refer to the manual for specific electrical safety guidelines to prevent hazards․

Installation Guide for KoolKing Air Conditioner

Ensure proper location, leveling, and secure installation․ Use appropriate tools and materials as outlined․ Refer to the manual for detailed steps to ensure safe and correct setup․

3․1 Window/Wall Type Installation Steps

For window/wall installation, first select a suitable location ensuring proper drainage and airflow․ Mount the unit securely in the window or wall opening․ Use the provided bracket and screws․ Ensure the unit is level to prevent water accumulation․ Seal gaps with weatherstripping to maximize efficiency․ Follow the manual’s step-by-step instructions for precise installation․ Always unplug the unit during installation to avoid electrical hazards․ Double-check all connections before powering on․

3․2 Portable Air Conditioner Installation

For portable installation, place the unit on a firm, level surface indoors․ Attach the exhaust hose to the unit and extend it through a window or sliding door․ Secure the window kit to ensure a tight seal․ Plug in the unit and ensure all connections are tight․ Drainage hoses, if applicable, should be directed to a suitable drainage location․ Follow all safety guidelines to prevent water leaks or electrical issues․ Ensure proper ventilation to maintain efficiency and avoid overheating․

3․3 Required Tools and Materials

Ensure you have the following tools and materials before installation: screws, a screwdriver, a drill, measuring tape, and a level․ For portable units, include the provided window kit, exhaust hose, and drainage hose․ Additional materials like foam insulation or weatherstripping may be needed for a secure window seal․ Always refer to the manual for specific requirements․ Gather all components before starting to avoid delays․ Proper preparation ensures a smooth and efficient installation process․

Understanding the Air Conditioner Features

Explore the KoolKing Air Conditioner’s advanced features, including cooling, heating modes, fan speeds, and smart controls․ These features ensure comfort and energy efficiency year-round․

4․1 Overview of Cooling and Heating Modes

The KoolKing Air Conditioner offers versatile operation with both cooling and heating modes․ In cooling mode, it efficiently lowers the room temperature, while heating mode provides warmth during colder months․ The unit seamlessly transitions between modes based on temperature settings․ indicator lights on the indoor unit signal the active mode․ Proper use of these modes ensures year-round comfort and energy efficiency․ Always refer to the manual for optimal temperature adjustments and mode selections to maintain performance and energy savings․

4․2 Fan Speed Settings and Modes

The KoolKing Air Conditioner features multiple fan speed settings and modes to customize airflow․ Low, medium, and high fan speeds allow precise control over air circulation․ Additional modes include silent operation for reduced noise and turbo mode for rapid cooling or heating․ These settings enhance comfort and energy efficiency․ Use the remote control to easily switch between modes and adjust fan speeds․ Proper use of these features ensures optimal performance and tailored comfort for various room conditions and personal preferences․

4․3 Smart Features and Remote Control Functions

The KoolKing Air Conditioner offers advanced smart features for seamless operation․ Use the remote control to adjust settings, activate modes, and monitor performance․ Features include Wi-Fi connectivity for app control, scheduling, and energy-saving modes․ The remote allows you to regulate temperature, fan speed, and operation modes effortlessly․ Smart sensors optimize cooling or heating based on room conditions․ These functions enhance convenience, efficiency, and comfort, ensuring a personalized experience with minimal effort․ Explore all features to maximize your air conditioner’s potential and enjoy a smarter cooling solution․

Operating the KoolKing Air Conditioner

Press the power button to turn it on, select your preferred mode, and adjust settings using the remote or control panel for optimal performance and comfort․

5․1 Turning On the Air Conditioner

To turn on the KoolKing Air Conditioner, ensure it is properly plugged into a grounded electrical outlet․ Press the power button on the remote or control panel․ Select your desired mode using the remote or buttons on the unit․ Choose between cooling, heating, or fan-only modes․ Adjust the temperature and fan speed to your preference using the corresponding buttons․ The display will show the current settings․ Always ensure the unit is installed correctly and grounded for safe operation․ Refer to the manual for specific button functions and mode options․

5․2 Adjusting Temperature and Fan Settings

To adjust the temperature, use the remote or control panel to set your desired temperature between 60°F and 90°F․ Press the up or down arrows to increase or decrease the temperature․ For fan speed, select from low, medium, or high settings using the fan speed button․ The remote may also have dedicated buttons for temperature and fan control․ Ensure the unit is set to the correct mode (cooling or heating) before adjusting settings․ Automatic mode allows the unit to adjust settings based on room temperature for optimal comfort and energy efficiency․

5․3 Using the Remote Control Effectively

The remote control allows easy operation of your KoolKing Air Conditioner․ Replace batteries (2 x AAA) when the remote’s range weakens․ Aim the remote directly at the unit for best performance․ Use the mode button to switch between cooling, heating, or fan-only modes․ Adjust temperature and fan speed using the corresponding buttons․ The timer function lets you set start/stop times․ For optimal use, ensure no obstructions block the infrared signal․ Refer to the manual for specific button functions and advanced features․

Maintenance and Cleaning Tips

Regular maintenance ensures efficient performance․ Clean the air filter monthly and check the condenser for dust buildup․ Drain excess water to prevent mold and mildew growth, ensuring optimal humidity control․

6․1 Regular Maintenance Schedule

Establish a routine maintenance schedule to keep your KoolKing Air Conditioner running efficiently․ Clean or replace the air filter every 30 days to improve airflow and reduce energy consumption․ Check and clean the condenser coils quarterly to prevent dust buildup, which can hinder performance․ Drain accumulated water monthly to avoid mold growth and ensure proper humidity control․ Schedule professional servicing annually to inspect internal components and address potential issues before they escalate․ Regular maintenance extends the lifespan of your unit and maintains optimal cooling performance․

6․2 Cleaning the Air Filter and Condenser

Regularly cleaning the air filter and condenser is crucial for maintaining your KoolKing Air Conditioner’s efficiency․ Turn off the power before starting․ Remove the air filter and vacuum or wash it with mild soap, then dry thoroughly before reinstalling․ For the condenser, gently brush off dirt and wipe with a soft cloth․ Clean the condenser monthly to prevent dust buildup․ Ensure proper airflow by inspecting and cleaning these components regularly․ This maintenance ensures optimal cooling performance and prevents potential issues․ Cleaning the filter every 30 days and the condenser quarterly is recommended for best results․

6․3 Draining Water and Managing Humidity

Regularly drain water from your KoolKing Air Conditioner to prevent leaks and mold growth․ Check the drain hose for kinks or blockages and ensure proper water flow․ For portable models, empty the water tank when full․ To manage humidity, use the dehumidify mode or adjust settings to balance moisture levels․ Ensure good ventilation in the room to prevent excessive condensation․ Clean the drain pan periodically and inspect for mineral buildup․ Proper water management enhances efficiency and prolongs the unit’s lifespan․ Always follow the manual for specific drainage instructions․

Troubleshooting Common Issues

Identify common problems like error codes, uneven cooling, or noise․ Check power supply, filter cleanliness, and installation․ Refer to the manual for solutions or contact support if unresolved․

7․1 Identifying Common Problems

Common issues include error codes, uneven cooling, or unusual noise․ Check for power supply issues, dirty air filters, or improper installation․ Water leakage or drainage problems may occur if the unit isn’t level․ Remote control malfunctions can prevent proper operation․ Ensure all settings are correct and restart the unit if necessary․ If issues persist, refer to the troubleshooting guide or contact customer support for assistance․ Regular maintenance can help prevent many of these problems․

7․2 Resetting the Air Conditioner

Resetting your KoolKing Air Conditioner can resolve many issues․ Unplug the unit from the power source, wait for 30 seconds, and plug it back in․ This resets the system․ If the issue persists, check the circuit breaker or fuse․ Ensure the air filter is clean and properly installed․ For smart models, restart the remote control by removing batteries for 10 seconds․ If problems continue, refer to the error codes section or contact customer support for further assistance․

7․3 Error Codes and Solutions

Your KoolKing Air Conditioner may display error codes to indicate specific issues․ For example, E1 often relates to sensor malfunctions, while E2 may signal refrigerant leaks․ E3 could indicate a communication error between indoor and outdoor units․ To resolve these, turn off the unit, unplug it, and wait 30 seconds․ Plug it back in and check if the error persists․ Clean the air filter and ensure proper installation․ If issues remain, refer to the troubleshooting section or contact customer support for professional assistance․

Technical Specifications and Warranty

The KoolKing Air Conditioner features a 12,000 BTU cooling capacity, suitable for rooms up to 450 sq․ ft․ It includes a 5-year compressor warranty and 1-year parts warranty․

8․1 Key Technical Details of the KoolKing AC

The KoolKing AC operates with a 12,000 BTU cooling capacity, ideal for spaces up to 450 sq․ ft․ It features a multi-step fan speed system and energy-efficient inverter technology․ The unit includes a 24-hour timer, remote control, and smart sensor for temperature regulation․ Designed for both cooling and heating modes, it ensures year-round comfort․ The AC is equipped with a washable air filter and self-evaporative system for efficient water management․ Its compact design fits seamlessly into modern interiors․

8․2 Warranty Information and Support

Your KoolKing AC is backed by a comprehensive 5-year warranty on the compressor and a 2-year warranty on parts and labor․ For warranty claims, register your product online within 30 days of purchase․ Customer support is available via phone or email for technical assistance․ Visit the official website for detailed warranty terms, FAQs, and service center locations․ Ensure to retain your purchase receipt and manual for warranty validation․ Contact support for any inquiries or repairs to maintain your product’s performance and longevity․

8․3 Contacting Customer Service

For assistance with your KoolKing Air Conditioner, contact our dedicated customer service team․ Call toll-free at 1-800-KOOLKING (1-800-566-5546) or email support@koolking․com․ Visit our official website for live chat support, FAQs, and downloadable resources․ For in-person service, locate your nearest authorized service center using the “Service Locator” tool on our website․ When contacting us, please have your model number and purchase details ready for efficient support․ Our team is available Monday-Friday, 9 AM to 6 PM EST, to address your inquiries and concerns promptly․

Energy Efficiency and Eco-Friendly Tips

Optimize energy savings with KoolKing’s eco-friendly features․ Use smart settings to reduce consumption․ Regular maintenance enhances efficiency, promoting sustainable cooling solutions for a greener environment․

9․1 Energy-Saving Features of the KoolKing AC

The KoolKing AC is designed with advanced energy-saving features to minimize power consumption while maintaining optimal cooling․ It includes smart sensors that adjust cooling based on room occupancy and temperature, ensuring efficient energy use․ The eco-mode reduces energy consumption by optimizing fan speed and compressor operation․ Additionally, the inverter technology provides consistent cooling with lower power usage․ These features not only lower your electricity bills but also contribute to a more sustainable environment․ Regular maintenance, as outlined in this manual, further enhances energy efficiency․

9․2 Reducing Energy Consumption

To reduce energy consumption with your KoolKing AC, set the temperature between 22-25°C for optimal cooling․ Use the eco-mode to lower power usage during operation․ Ensure proper installation to avoid energy loss, and clean the air filter regularly to maintain efficiency․ Close windows and doors to prevent cool air from escaping, and use the timer function to turn off the AC when not needed․ These practices help minimize energy waste and lower your electricity bills while keeping your space comfortable․

9․3 Eco-Friendly Usage Practices

Adopt eco-friendly practices to minimize environmental impact while using your KoolKing AC․ Always follow the manual’s guidelines for proper installation and maintenance to ensure efficient operation․ Regularly clean the air filter to prevent dust buildup, which can reduce energy efficiency․ Use the eco-mode to optimize cooling while lowering power consumption․ Additionally, utilize the smart features to monitor and control energy usage remotely․ By adhering to these practices, you can reduce your carbon footprint and contribute to a more sustainable environment while enjoying a comfortable space․

PDF

sdtm 3.3 pdf

SDTM 3.3 is a foundational standard by CDISC for clinical trial data, ensuring consistent organization and structuring of datasets for regulatory submissions and analysis.

1.1 What is SDTM 3.3?

SDTM 3.3, published by CDISC, is a standardized model for organizing and structuring clinical trial data. It provides guidelines for data tabulation to ensure consistency and interoperability. The standard defines how clinical data should be collected, stored, and presented, facilitating regulatory submissions and cross-study comparisons. SDTM 3.3 is widely adopted in the pharmaceutical industry to enhance data quality and compliance with regulatory requirements. It is available as a PDF document, offering detailed implementation guidance for sponsors and researchers.

1.2 Importance of SDTM 3.3 in Clinical Trials

SDTM 3.3 plays a critical role in clinical trials by standardizing data collection and reporting. It ensures data consistency, traceability, and compliance with regulatory requirements, facilitating easier review by authorities. The model enables seamless data sharing and analysis across trials, promoting collaboration and reducing duplication of efforts. By providing a common framework, SDTM 3.3 enhances the quality and reliability of clinical trial data, ultimately supporting faster drug development and approval processes while maintaining patient safety and data integrity.

Key Features of SDTM 3.3

SDTM 3.3 introduces enhanced data standardization, new domains, and improved metadata handling, ensuring better clinical trial data organization and compliance with regulatory requirements.

2.1 New Domains Introduced in SDTM 3.3

SDTM 3.3 introduces new domains to address emerging clinical trial data needs. These include domains for interventions, events, and other specialized data, enhancing data capture and standardization. These additions ensure comprehensive representation of trial data, facilitating accurate analysis and reporting. The new domains align with regulatory requirements and improve data consistency across studies, making it easier for sponsors to submit standardized datasets to regulatory authorities. This update reflects CDISC’s commitment to adapting to evolving clinical trial demands.

2.2 Enhanced Data Collection and Reporting Capabilities

SDTM 3.3 enhances data collection and reporting by providing standardized tools and methodologies. It introduces improved data structures for capturing complex clinical trial data, ensuring accuracy and consistency. The updated standard supports detailed documentation of trial processes, enabling clearer data interpretation. Additionally, SDTM 3.3 facilitates the creation of standardized datasets, which are critical for regulatory submissions. These enhancements streamline data management and reporting, making it easier to meet regulatory requirements and improve the overall efficiency of clinical trials.

2.3 Improved Metadata Standards

SDTM 3.3 incorporates enhanced metadata standards, ensuring precise definitions and consistent use of data elements. These improvements facilitate better data traceability and clarity, aiding in regulatory compliance. The updated metadata standards enable more accurate documentation of data origins and transformations, which is crucial for reproducibility and validation. This feature also supports interoperability across different systems, making data integration and analysis more efficient. By standardizing metadata, SDTM 3.3 strengthens the overall quality and reliability of clinical trial datasets, benefiting both researchers and regulatory agencies.

Domains in SDTM 3.3

SDTM 3.3 introduces standardized domains like Interventions (INT) and Events (EV), ensuring consistent data organization for clinical trials, facilitating analysis and regulatory compliance efficiently.

3.1 Interventions Domain (INT)

The Interventions domain (INT) in SDTM 3.3 captures detailed information about treatments, including dosage, administration routes, and timing. This domain is crucial for tracking therapeutic interventions, ensuring data consistency and enabling precise analysis of treatment effects. By standardizing intervention data, INT supports regulatory submissions and facilitates cross-study comparisons. It also enhances traceability of treatment regimens, making it indispensable for clinical trial data management and analysis.

3.2 Events Domain (EV)

The Events domain (EV) in SDTM 3.3 captures adverse events, efficacy outcomes, and other significant occurrences during clinical trials. It standardizes event descriptions, severity, and related interventions, ensuring consistency across datasets. This domain is critical for regulatory reporting and analysis, as it provides clear documentation of trial outcomes. By organizing event data systematically, EV supports efficient review by regulators and facilitates cross-study comparisons. It is essential for assessing safety and efficacy in clinical trials, making it a cornerstone of SDTM 3.3.

3.3 Other Key Domains

Other key domains in SDTM 3.3 include Demographics (DM), Vital Signs (VS), and Laboratory (LB). DM captures patient characteristics, while VS and LB store essential health metrics. These domains ensure comprehensive data collection, supporting regulatory compliance and analysis. They align with CDISC standards, enhancing data consistency and interoperability, which is vital for clinical trial submissions. These domains are integral to the structure and utility of SDTM 3.3, enabling seamless integration of diverse data types within a unified framework for clinical research.

Implementation Rules for SDTM 3.3

SDTM 3.3 implementation requires adherence to standardized data structures, variable naming, and controlled terminology to ensure consistency and regulatory compliance. Proper documentation and validation are essential.

4.1 General Implementation Considerations

Implementing SDTM 3.3 requires a thorough understanding of the standard and adherence to its guidelines. Key considerations include proper data structuring, accurate variable naming, and the use of controlled terminology. It is essential to ensure consistency across all datasets and to document metadata appropriately. Additionally, users should be aware of new domains introduced in SDTM 3.3 and their specific requirements. Validation processes, such as OpenCDISC or Pinnacle21, can help ensure compliance. Proper training and resources, including the official CDISC documentation, are critical for successful implementation.

4.2 Specific Rules for Data Tabulation

SDTM 3.3 specifies rules for structuring datasets, including variable naming, controlled terminology, and domain-specific requirements. New domains like RELATIONSHIPS and CNTMOD must be accurately populated. Variables should follow standard naming conventions, using prefixes and suffixes appropriately. Data must be organized to support regulatory reporting, with clear relationships between domains. Controlled terminology ensures consistency across datasets. Validation tools, such as OpenCDISC or Pinnacle21, can verify compliance with these rules. Proper implementation of these guidelines ensures high-quality, submission-ready datasets for regulatory review.

Relationship Between SDTM 3.3 and Other CDISC Standards

SDTM 3.3 aligns with ADaM for analysis datasets and CDASH for data collection, ensuring a cohesive framework for clinical trial data from collection to regulatory submission.

5.1 ADaM (Analysis Data Model)

ADaM complements SDTM 3.3 by providing structured analysis datasets for regulatory submissions. It supports statistical analysis and traceability, ensuring consistency between raw data and analysis results.

5.2 CDASH (Clinical Data Acquisition Standards Harmonization)

CDASH streamlines clinical data collection by providing standardized templates and guidelines, ensuring consistency across studies. It aligns with SDTM 3.3 by defining common data elements and formats, facilitating seamless data transition from acquisition to analysis. This harmonization reduces data discrepancies and enhances interoperability, supporting efficient regulatory submissions and cross-study comparisons; CDASH focuses on collecting data in a structured manner, while SDTM 3.3 organizes it for analysis, together enabling a robust end-to-end data management process in clinical trials.

Version History and Updates

SDTM 3.3 introduces updates from the previous 3.2 version, released on November 20, 2018, incorporating new domains and enhanced metadata standards for clinical trial data structure.

6.1 Changes from SDTM 3.2 to 3.3

SDTM 3.3 introduces several updates from version 3.2, including new domains, enhanced metadata standards, and revised implementation rules. Key changes involve corrections to the RELATIONSHIPS codelist and updates to domain structures to improve data consistency. Additionally, new variables were added to support expanded clinical trial data requirements, ensuring better alignment with regulatory expectations and improved data interchange. These updates reflect CDISC’s commitment to evolving standards to meet the needs of clinical research and regulatory submissions.

6.2 Version 3.3 vs. Earlier Versions

Version 3.3 of SDTM offers enhanced functionality compared to earlier versions, with improved metadata standards and new domains for better data organization. It addresses inconsistencies found in previous versions, such as corrections to the RELATIONSHIPS codelist and expanded support for clinical trial data. These updates ensure greater consistency and alignment with regulatory requirements, making version 3.3 more robust for clinical trial submissions. The improvements reflect CDISC’s ongoing efforts to refine standards for more efficient and accurate data management in clinical research.

Best Practices for Using SDTM 3.3

Adhere to CDISC guidelines, use standardized terminology, and validate data regularly. Ensure compliance with regulatory requirements and reference the official SDTM 3.3 PDF documentation for accuracy.

7.1 Data Standardization Tips

Ensure all data elements align with CDISC standards by using controlled vocabularies and predefined codes. Reference the SDTM 3.3 PDF guide for domain-specific instructions and examples. Standardize variable names, formats, and codelist values to maintain consistency across datasets. Use validation tools to check compliance with SDTM rules. Document all standardization decisions for transparency and reproducibility. Regularly update your knowledge of CDISC updates and incorporate feedback from regulatory reviews to optimize data quality.

7.2 Ensuring Compliance with Regulatory Requirements

Compliance with regulatory requirements is critical when using SDTM 3.3. Always refer to the official CDISC guidelines and the SDTM 3.3 PDF documentation for precise instructions. Ensure all datasets adhere to the specified domains, variables, and codelists. Use validation tools to verify SDTM compliance before submission. Maintain detailed documentation of data processing steps and standardization decisions. Stay updated on regulatory expectations and incorporate feedback from previous submissions to align with agency requirements and avoid delays in approvals.

Challenges in Implementing SDTM 3.3

Implementing SDTM 3.3 can be complex due to new domains, updated metadata standards, and enhanced reporting requirements, often requiring significant time and expertise to adapt.

8.1 Common Issues Faced by Users

Users often encounter challenges with SDTM 3.3, including understanding new domains, interpreting updated metadata standards, and ensuring compliance with enhanced data collection requirements. Additionally, the complexity of integrating SDTM 3.3 with other CDISC standards like ADaM and CDASH can pose difficulties. Proper training and adherence to official CDISC documentation are essential to mitigate these issues and ensure successful implementation. These challenges highlight the need for thorough preparation and expertise in clinical data management.

8.2 Overcoming Implementation Hurdles

Overcoming SDTM 3.3 implementation challenges requires a combination of detailed planning, training, and leveraging resources. Utilizing official CDISC documentation and software tools can streamline data tabulation. Collaborating with experienced professionals and staying updated on best practices also helps address common issues. Additionally, engaging with CDISC communities and attending workshops provides valuable insights and solutions. By adopting these strategies, users can effectively navigate the complexities of SDTM 3.3 and ensure compliant, high-quality clinical trial data submissions.

Tools and Resources for SDTM 3.3

Key tools include Define-XML for dataset validation and software tools for data tabulation. Official CDISC documentation and the CDISC Wiki provide comprehensive guidance and resources.

9.1 Software Tools for Data Tabulation

Software tools like Define-XML and SAS enable efficient data tabulation compliant with SDTM 3.3 standards. These tools support dataset validation, ensuring accuracy and adherence to regulatory requirements. Open-source solutions, such as PySDTM, also provide flexibility for custom implementations. Additionally, tools like Excel and specialized EDC systems facilitate data mapping and standardization. These resources streamline the process of creating SDTM-compliant datasets, reducing errors and improving submission readiness. Proper use of these tools ensures alignment with CDISC guidelines, enhancing overall data quality and regulatory compliance.

9.2 Official CDISC Documentation

The official CDISC documentation for SDTM 3.3 provides comprehensive guidance on implementing the standard. Available as PDFs, these documents include detailed explanations of domains, metadata standards, and compliance requirements. The SDTM Implementation Guide (IG) 3.3 outlines the latest updates, ensuring alignment with regulatory expectations. These resources are essential for understanding how to structure and submit clinical trial data effectively, serving as the definitive reference for implementing SDTM 3.3 in clinical research settings.

Validation and Quality Control

SDTM 3.3 ensures data accuracy and regulatory compliance through rigorous validation checks. It includes data integrity verification and conformance to standards, supporting reliable clinical trial submissions.

10.1 Validating SDTM 3.3 Data

Validating SDTM 3.3 data ensures compliance with CDISC standards and regulatory requirements. This process involves checking data structure, metadata, and content against the SDTM Implementation Guide. Tools like DEFINE-XML and validation scripts are used to verify data integrity and adherence to domain-specific rules. Structural validation ensures proper dataset organization, while semantic validation checks data consistency and accuracy. Automated validation processes help identify errors early, ensuring high-quality datasets for regulatory submissions and analysis. This step is critical for maintaining data reliability and meeting submission standards.

10.2 Quality Assurance Best Practices

Quality assurance for SDTM 3.3 involves thorough reviews of data structures and content. Standardized documentation and cross-domain consistency checks are essential. Regular training on CDISC updates ensures teams stay informed. Automation tools, like DEFINE-XML, help maintain data integrity. Rigorous testing and validation cycles are critical before final submission. Proper documentation of validation processes ensures traceability and compliance with regulatory standards. These practices ensure high-quality, reliable datasets that meet both CDISC standards and regulatory expectations, facilitating smooth submissions and analysis.

Case Studies and Real-World Applications

Real-world applications of SDTM 3.3 include successful implementations in clinical trials by Vertex Pharmaceuticals, demonstrating enhanced data consistency, streamlined reporting, and improved data standardization for regulatory submissions.

11.1 Successful Implementation Examples

Vertex Pharmaceuticals successfully implemented SDTM 3.3, achieving enhanced data consistency and streamlined reporting. This implementation highlighted the standard’s ability to improve data standardization, facilitating faster regulatory submissions. Real-world applications demonstrated reduced submission times and improved data quality, enabling clearer communication of trial results. Such examples underscore SDTM 3.3’s effectiveness in modern clinical trials, showcasing its practical benefits for sponsors and researchers.

11.2 Lessons Learned from Industry Applications

Industry applications of SDTM 3.3 reveal key lessons, such as the importance of thorough data standardization and cross-functional collaboration. Vertex Pharmaceuticals’ implementation highlighted challenges in mapping legacy data to new domains. Addressing these issues required enhanced documentation and training. Additionally, the use of automated tools improved compliance with regulatory standards. These lessons emphasize the need for robust planning and stakeholder engagement to maximize the benefits of SDTM 3.3 in clinical trials, ensuring data integrity and submission readiness.

Future of SDTM 3.3 and Beyond

Future updates to SDTM 3.3 will focus on enhanced domains, improved metadata standards, and expanded support for emerging data types, ensuring better data quality and regulatory compliance.

12.1 Upcoming Updates and Enhancements

CDISC plans to introduce new domains and enhance existing ones in SDTM 3.3 to align with evolving clinical trial requirements. Upcoming updates will focus on improving data standardization, expanding support for decentralized trials, and incorporating feedback from industry stakeholders. Enhanced metadata standards will ensure better traceability and interoperability of clinical data. Additionally, the updates will streamline the integration of emerging data types, such as wearables and real-world data, into the SDTM framework. These changes aim to improve data quality and facilitate regulatory submissions.

12.2 Impact on Future Clinical Trials

SDTM 3.3 will significantly influence future clinical trials by enhancing data standardization and interoperability. Its improved metadata standards and new domains will enable better data quality and consistency, facilitating faster regulatory reviews. The standard’s support for decentralized trials and real-world data integration will expand trial accessibility and inclusivity. Additionally, SDTM 3.3’s alignment with global regulatory requirements will streamline cross-border submissions, reducing duplication and speeding up decision-making. These advancements position SDTM 3.3 as a critical enabler of more efficient, patient-centric, and innovative clinical research globally.

SDTM 3.3 represents a significant advancement in clinical trial data standardization, offering enhanced tools and guidelines for improved data quality and regulatory compliance. By providing a robust framework for data organization and reporting, SDTM 3.3 supports more efficient and accurate analysis, ultimately driving better decision-making in clinical research. Its adoption ensures consistency across trials, facilitating collaboration and innovation. As the clinical trials landscape evolves, SDTM 3.3 will remain a cornerstone for standardized data management, enabling faster drug development and advancing public health.

PDF

nordson problue 10 manual pdf

The Nordson ProBlue 10 is a high-performance adhesive dispensing system designed for precision and efficiency in industrial applications. This manual provides essential guidance for safe operation‚ installation‚ and maintenance. Always consult the manual before use to ensure optimal performance and compliance with safety standards. Nordson Corporation is committed to delivering reliable solutions for adhesive dispensing needs.

1.1 Overview of the Nordson ProBlue 10 Glue Machine

The Nordson ProBlue 10 is a high-performance adhesive dispensing system engineered for precision and reliability in industrial applications. It is designed to meet the demands of various industries‚ offering advanced features for consistent glue application. The machine is user-friendly‚ with intuitive controls and customizable settings to suit specific production needs. Its robust design ensures durability and longevity‚ while its compatibility with Nordson accessories enhances versatility. The ProBlue 10 is ideal for operations requiring high-volume adhesive dispensing‚ making it a trusted solution for manufacturers worldwide. This manual provides detailed insights into its operation‚ ensuring users can maximize its potential while maintaining safety and efficiency.

1.2 Importance of the Manual for Safe and Effective Operation

The manual is crucial for safe and effective operation of the Nordson ProBlue 10. It contains essential safety information‚ operating instructions‚ and maintenance guidelines to ensure optimal performance. Proper use of the machine‚ as outlined in the manual‚ minimizes risks of injury and equipment damage. Users must adhere to the instructions to avoid unintended operations. The manual also provides troubleshooting tips and technical specifications‚ enabling users to resolve issues efficiently. By following the guidelines‚ operators can extend the machine’s lifespan and maintain productivity. Always refer to the manual before starting any task to ensure compliance with safety protocols and best practices.

Safety Information and Precautions

Adhere to safety guidelines in the manual to prevent injuries and equipment damage. Use the Nordson ProBlue 10 only as described to ensure safe and reliable operation.

2.1 General Safety Guidelines for Operating the ProBlue 10

Always read and follow the safety information in the Nordson ProBlue 10 manual to ensure safe operation. Use the equipment only as described and avoid unauthorized modifications. Wear protective gear when handling adhesives or performing maintenance. Ensure proper ventilation in the work area to prevent inhaling fumes. Keep loose clothing and long hair tied back to avoid entanglement with moving parts. Never operate the machine while fatigued or distracted. Familiarize yourself with emergency stop procedures and keep the area clear of flammable materials. Regularly inspect equipment for damage and report any issues to prevent accidents. Nordson Corporation is not responsible for injuries caused by non-compliance with these guidelines.

2.2 Proper Equipment Usage as Described in the Manual

Adherence to the Nordson ProBlue 10 manual is crucial for proper equipment usage. Always follow the instructions provided to ensure safe and effective operation. Use only genuine Nordson parts and accessories to maintain performance and reliability. Ensure all operations are carried out by authorized personnel who have thoroughly reviewed the manual. Deviating from the recommended usage or attempting unauthorized modifications can lead to equipment damage or safety hazards. Refer to the manual for specific guidelines on adhesive handling‚ application rates‚ and environmental conditions. Proper usage aligns with warranty terms and ensures optimal functionality. Misuse may void the warranty or result in liability issues. Nordson Corporation emphasizes strict compliance with manual instructions to guarantee operational excellence and user safety.

2.3 Emergency Procedures and Safety Protocols

In case of an emergency‚ immediately shut off the power supply to the Nordson ProBlue 10 and evacuate the area if necessary. Refer to the manual for specific emergency procedures‚ such as handling adhesive spills or system malfunctions. Always maintain a fire extinguisher nearby and ensure proper ventilation. Follow the manual’s safety protocols for situations like overheating or equipment failure. Regular safety drills and training are recommended to prepare operators for potential emergencies. Keep emergency contact information readily available‚ including Nordson technical support. Adhering to these protocols ensures operator safety and minimizes risks associated with equipment operation. Always prioritize safety as outlined in the manual.

System Installation and Setup

Proper installation ensures optimal performance. Follow the manual’s step-by-step guide for setup‚ including prerequisites‚ system alignment‚ and calibration. Ensure all power and connectivity requirements are met.

3.1 Prerequisites for Installing the ProBlue 10

Before installing the Nordson ProBlue 10‚ ensure the environment meets specified conditions. Power supply‚ temperature‚ and humidity levels must align with manufacturer recommendations. Ensure all necessary tools and accessories are available. Review the manual for compatibility with existing systems. Properly prepare the mounting surface to avoid vibration and ensure stability. Familiarize yourself with safety protocols to prevent accidents during installation. Ensure all personnel involved are trained and authorized to handle the equipment. Adhering to these prerequisites guarantees a smooth and safe installation process‚ minimizing downtime and optimizing system performance from the start.

3.2 Step-by-Step Installation Process

Begin by unpacking the Nordson ProBlue 10 and verifying all components are included. Mount the unit on a stable‚ vibration-free surface using the provided hardware. Connect the power supply and ensure it meets the system’s voltage requirements. Next‚ attach the pneumatic and adhesive lines according to the manual’s specifications. Power on the system and perform a self-test to ensure proper functionality. Calibrate the adhesive dispensing parameters as needed. Finally‚ secure all connections and verify system operation before commencing production. Always follow the manual’s instructions for a safe and accurate installation process.

Operating the Nordson ProBlue 10

Start the system by powering on and initializing the control panel. Program dispensing settings and parameters as required. Monitor operations and adjust settings for optimal performance.

4.1 Getting Started with the ProBlue 10

Begin by ensuring the system is properly installed and powered off. Locate the control panel and review its interface. Power on the system and follow the start-up sequence outlined in the manual. Initialize the control panel by entering the default password or setting a new one. Review safety precautions and ensure all guards are in place. Familiarize yourself with the adhesive dispensing process and load the appropriate adhesive material. Refer to the manual for specific instructions on calibrating the system and setting dispensing parameters. Conduct a test run to ensure proper functionality before initiating full-scale operations.

4.2 Programming and Customizing Settings

To program the ProBlue 10‚ access the control panel and navigate to the settings menu. Set specific parameters such as temperature‚ pressure‚ and dispensing cycle times to meet your application needs. Use the manual to guide you through customizing dispensing patterns and adhesive flow rates. Save your settings as a custom profile for future use. Ensure all changes are confirmed and saved to avoid data loss. For advanced customization‚ refer to the manual for detailed instructions on configuring optional features. Always test your settings with a trial run before full production to ensure accuracy and consistency in adhesive application.

4.3 Navigating the Control Panel and Interface

The ProBlue 10’s control panel features an intuitive interface designed for easy operation. The touchscreen display provides clear access to settings‚ operation modes‚ and system status. Use the navigation buttons to scroll through menus and adjust parameters. The manual details each icon and button function‚ ensuring seamless interaction. Familiarize yourself with the power button‚ menu navigation‚ and shortcut keys. Customize the display to prioritize frequently used functions. The interface supports multiple languages and offers real-time feedback for troubleshooting. Refer to the manual for detailed instructions on utilizing advanced features and optimizing the control panel for your specific application needs.

Maintenance and Troubleshooting

Regular maintenance ensures optimal performance and longevity. Follow manual guidelines for routine checks‚ cleaning‚ and part replacement. Address common issues promptly to prevent operational disruptions.

5.1 Routine Maintenance Tasks for Optimal Performance

Regular maintenance is crucial for ensuring the Nordson ProBlue 10 operates efficiently. Daily checks include inspecting adhesive levels‚ cleaning nozzles‚ and verifying proper system alignment. Weekly‚ users should clean the pump and hoses‚ and replace worn or damaged seals. Monthly‚ perform a thorough inspection of the control panel and electrical connections. Refer to the manual for specific maintenance schedules and procedures. Always use genuine Nordson parts for replacements to maintain performance and warranty validity. Proper maintenance prevents downtime and extends the system’s lifespan‚ ensuring reliable adhesive dispensing in industrial applications.

5.2 Common Issues and Troubleshooting Techniques

Troubleshooting is crucial for resolving issues with the Nordson ProBlue 10. Common problems include clogged nozzles‚ inconsistent adhesive flow‚ and error messages. For clogs‚ clean nozzles with approved solvents. Inconsistent flow may require adjusting pressure settings or replacing worn seals. Error messages often indicate system malfunctions; restart the unit and check connections. If issues persist‚ consult the manual or contact Nordson support. Regular maintenance can prevent many problems. Always use genuine Nordson parts for repairs to ensure compatibility. Proper troubleshooting ensures minimal downtime and maintains productivity in industrial adhesive dispensing applications.

Technical Specifications

The Nordson ProBlue 10 features advanced hardware and intuitive software‚ ensuring compatibility with Nordson systems for reliable performance in various industrial applications.

6.1 Hardware and Software Requirements

The Nordson ProBlue 10 operates on a robust hardware platform‚ requiring a compatible operating system for optimal performance. The system supports advanced software updates‚ ensuring enhanced functionality and security. Hardware components are designed for durability and integration with Nordson systems. Software requirements include compatibility with specific versions of operating systems and adherence to Nordson’s updates. Proper installation ensures seamless operation and compliance with safety standards. Always refer to the official manual for detailed specifications and compatibility guidelines to maintain system efficiency and reliability. Regular software updates are crucial for accessing new features and troubleshooting capabilities. Ensure all hardware and software meet Nordson’s recommendations for optimal performance.

6.2 Compatibility with Other Nordson Systems

The Nordson ProBlue 10 is designed to integrate seamlessly with other Nordson systems‚ ensuring enhanced workflow efficiency and compatibility. This compatibility allows for synchronized operation with Nordson adhesive dispensing and industrial coating systems. The ProBlue 10’s design ensures it can work in harmony with other Nordson equipment‚ providing a cohesive solution for industrial applications. The manual provides detailed guidelines for integrating the ProBlue 10 with other Nordson systems‚ ensuring optimal performance and compatibility. Proper integration enhances operational efficiency and ensures adherence to safety and operational standards. Always refer to the manual for specific compatibility requirements and guidelines to maximize system potential and maintain safety. This ensures a streamlined and efficient workflow across all connected systems.

Accessories and Consumables

The ProBlue 10 requires specific accessories and consumables for optimal performance. These include adhesive cartridges‚ nozzles‚ and maintenance kits. Always use Nordson-approved parts to ensure compatibility and safety. Refer to the manual for a detailed list of recommended accessories and consumables‚ and follow guidelines for ordering and replacing them to maintain system efficiency and longevity. Proper use of genuine Nordson parts ensures reliable operation and adherence to safety standards.

7.1 Compatible Parts and Accessories for the ProBlue 10

The Nordson ProBlue 10 requires specific compatible parts and accessories to ensure optimal performance and safety. Genuine Nordson components‚ such as adhesive cartridges‚ nozzles‚ and maintenance kits‚ are designed to meet precise specifications. Using non-approved parts may compromise system efficiency and safety. The manual provides a detailed list of recommended accessories‚ including compatible adhesive types and replacement parts. Always refer to the official Nordson documentation for verified suppliers and part numbers. Proper use of compatible accessories ensures adherence to safety standards and maintains the system’s reliability. Regularly updating and replacing consumables as specified in the manual is crucial for consistent operation.

7.2 Ordering and Replacing Consumables

Ordering and replacing consumables for the Nordson ProBlue 10 is straightforward when following the manual’s guidelines. Always refer to the official Nordson documentation for a list of approved consumables‚ including adhesive cartridges‚ nozzles‚ and maintenance kits. To ensure system performance and safety‚ use only genuine Nordson parts. When replacing consumables‚ turn off the system‚ allow it to cool‚ and follow the manual’s step-by-step instructions. Ordering can be done directly through Nordson or authorized distributors. Keep track of part numbers for quick reference. Proper disposal of used consumables is essential for environmental safety. Regularly updating consumables ensures optimal system functionality and longevity.

Software Updates and Support

Regular software updates ensure the Nordson ProBlue 10 operates at peak performance. Consult the manual for update instructions and access technical support through Nordson’s official channels for assistance.

8.1 Updating the ProBlue 10 Software

Updating the ProBlue 10 software is crucial for maintaining optimal performance and accessing new features. To update‚ save your current settings and navigate to the software update option in the control panel. Follow the on-screen instructions to download and install the latest version from Nordson’s official website. A progress bar will indicate the update status. Once complete‚ the system will validate the update and restart automatically. Always refer to the manual for detailed steps and ensure uninterrupted power supply during the process to avoid data loss. Regular updates ensure compatibility and enhance functionality‚ keeping your system up-to-date with the latest advancements.

8.2 Accessing Technical Support from Nordson

For technical assistance with the ProBlue 10‚ Nordson offers comprehensive support options. Visit the official Nordson website to access resources‚ troubleshooting guides‚ and contact information. You can reach Nordson’s support team via phone‚ email‚ or through their online support portal. Ensure to have your system serial number and a detailed description of the issue for faster resolution. Additionally‚ Nordson provides regional support centers to address location-specific queries. Regularly check the Nordson website for updated contact details and support materials. Always use official Nordson channels for support to ensure authenticity and reliability of the assistance provided.

Additional Resources

Explore official Nordson ProBlue 10 manuals‚ troubleshooting guides‚ and technical documents. Visit Nordson’s website for comprehensive support materials‚ including user manuals‚ FAQs‚ and software updates. Additionally‚ third-party forums and community discussions offer practical insights and solutions from experienced users.

9.1 Official Nordson ProBlue Manuals and Documentation

The official Nordson ProBlue 10 manual provides detailed instructions for installation‚ operation‚ and maintenance. It includes safety guidelines‚ troubleshooting tips‚ and technical specifications. Users can access these resources on Nordson’s official website‚ ensuring they have the most up-to-date information. The manual is available in PDF format‚ making it easy to download and reference. Additional documentation‚ such as Material Safety Data Sheets and software guides‚ is also available. These resources are essential for maximizing the performance and longevity of the ProBlue 10 system. Always refer to official Nordson materials for accurate and reliable information.

9.2 Third-Party Resources and Community Support

Beyond official documentation‚ third-party resources offer additional support for the Nordson ProBlue 10. Online forums and communities provide user-generated guides‚ troubleshooting tips‚ and real-world insights. Websites like Reddit and specialized engineering forums often feature discussions and solutions from experienced users. Additionally‚ third-party repair services and tutorial videos can supplement the official manual. These resources can be invaluable for addressing specific issues or optimizing system performance. While official manuals are essential‚ community support adds a layer of practical knowledge and shared experiences‚ helping users maximize their ProBlue 10’s potential. Always verify third-party information for accuracy and compatibility.

nano automatic pet feeder manual

Welcome to the Gamma2 Nano Automatic Pet Feeder manual, designed for effortless pet feeding. This guide covers setup, features, and troubleshooting to ensure optimal performance for your pet’s needs.

Overview of the Product

The Gamma2 Nano Automatic Pet Feeder is a cutting-edge, user-friendly device designed to simplify pet feeding. It combines advanced engineering with practical features to ensure precise portion control and freshness. With a durable design and triple gasket system, it keeps food fresh by sealing in moisture and protecting against UV rays. The feeder offers programmable feeding schedules, allowing up to 6 meal times per day, and a manual feed option for instant feeding. Its jam-proof design ensures smooth operation, while the battery backup maintains settings even during power outages. Suitable for both cats and dogs, the Nano feeder is compact, easy to clean, and compatible with various pet foods. Its intuitive control panel and smart features make it a convenient solution for busy pet owners, ensuring their pets receive the right amount of food at the right time.

Importance of Proper Setup and Usage

Proper setup and usage of the Gamma2 Nano Automatic Pet Feeder are crucial for ensuring optimal performance and your pet’s well-being. Before first use, carefully read the manual to understand all features and functions. Correctly programming feeding schedules and portion sizes is essential to prevent overfeeding or underfeeding. Improper setup may lead to malfunctions or inaccurate food dispensing. Regularly cleaning the feeder and maintaining its components, such as the lid, hopper, and bowl, ensures hygiene and prevents food from spoiling. The feeder’s advanced features, like the triple gasket system, require proper assembly to maintain food freshness. Additionally, understanding the manual feed function and power management is vital for seamless operation. By following the guidelines, you can ensure your pet receives the right amount of food at the right time, making feeding convenient and stress-free. Proper usage also extends the product’s lifespan and guarantees your pet’s health and satisfaction.

Key Features of the Nano Automatic Pet Feeder

The Nano Automatic Pet Feeder offers programmable feeding schedules, precise portion control, and a manual feed option. Its triple gasket system ensures food freshness, while the jam-proof design guarantees reliable operation.

Programmable Feeding Schedules

The Nano Automatic Pet Feeder allows users to set up to six feeding times per day, ensuring consistent and accurate meal distribution. With its advanced digital microprocessor, the device remembers programmed schedules even during power outages, thanks to a battery backup system. This feature is particularly beneficial for pet owners with busy schedules, as it maintains regular feeding routines without manual intervention. The feeder’s intuitive control panel makes it easy to customize meal times and portions, providing peace of mind for pet care. Additionally, the unit retains the clock time even when turned off, eliminating the need to reset schedules after power interruptions. This reliability ensures pets receive their meals on time, promoting healthy eating habits and reducing the risk of overfeeding or missed meals.

Manual Feeding Function

The Nano Automatic Pet Feeder features a convenient manual feeding option, allowing you to dispense food instantly at any time. This function is ideal for treating your pet or addressing unexpected feeding needs without altering the programmed schedule. By pressing the manual feed button, you can serve a precise portion of food, ensuring accuracy and control. The device is designed to prevent overfeeding, as it stops dispensing after a set amount to maintain your pet’s diet. This feature works seamlessly alongside the programmable feeding schedules, offering flexibility and peace of mind for pet owners. The manual feed option is particularly useful for pets that require occasional treats or for adjusting meal portions during training or special dietary needs. Its straightforward operation ensures that you can provide immediate feeding solutions while maintaining the convenience of automated scheduling.

Portion Control and Precision

The Nano Automatic Pet Feeder excels in portion control, delivering accurate measurements with each feeding. Its advanced dual-beam weighing mechanism and digital microprocessor ensure precise food dispensing, preventing overfeeding or underfeeding. This feature is crucial for maintaining your pet’s health and diet, especially for those with specific nutritional needs. The feeder allows customization of portion sizes, enabling you to set the exact amount of food for each meal. Whether it’s a small treat or a full meal, the Nano feeder maintains consistency, providing pet owners with confidence in their pet’s feeding routine. This precision is complemented by a user-friendly interface, making it easy to adjust portions as needed. The feeder’s design prioritizes accuracy, ensuring that every meal is served correctly, which is essential for pets with special dietary requirements or weight management plans. This level of control makes the Nano feeder a reliable choice for pet care.

Convenience and Ease of Use

The Nano Automatic Pet Feeder is designed with convenience and ease of use in mind, making it a stress-free solution for pet owners. Its programmable feeding schedules allow you to set up to 6 meal times per day, ensuring your pet is fed consistently, even when you’re not home. The intuitive control panel simplifies the setup process, and the feeder’s compact design fits seamlessly into any home. The manual feed option provides flexibility, letting you feed your pet instantly at the touch of a button. Additionally, the feeder features a battery backup, retaining the programmed schedule even during power outages. This ensures uninterrupted feeding and peace of mind for pet owners. The feeder’s ease of use extends to its low maintenance, with a focus on simplicity and reliability. Whether you’re a busy professional or a pet owner who values convenience, the Nano feeder delivers a hassle-free feeding experience tailored to your pet’s needs.

Technical Specifications of the Nano Automatic Pet Feeder

The Gamma2 Nano Click Manual Pet Feeder features a 5 lb food storage capacity, a unique gasket system for freshness, and a jam-proof design. It offers battery backup and is made by Petmate.

Design and Build Quality

The Gamma2 Nano Automatic Pet Feeder is constructed with durability and functionality in mind. Its sleek, compact design ensures it fits seamlessly into any home decor while maintaining efficiency. Built with high-quality materials, the feeder features Gamma Seal Technology, a unique triple gasket system that preserves food freshness by protecting it from air and moisture. The dark-tinted hopper bowl minimizes UV exposure, further maintaining food quality. The feeder’s jam-proof mechanism ensures smooth operation, preventing clogs and ensuring consistent feeding. With a storage capacity of up to 5 lbs, it is ideal for both small and medium-sized pets. The durable plastic construction and user-friendly interface make it both reliable and easy to clean. Petmate, the manufacturer, prioritizes pet safety and convenience, making the Gamma2 Nano a standout choice for pet owners seeking a dependable feeding solution.

Food Capacity and Storage

The Gamma2 Nano Automatic Pet Feeder offers a spacious food storage capacity of up to 5 lbs, making it ideal for both small and medium-sized pets. The feeder’s hopper is designed with a dark-tinted bowl to protect food from harmful UV rays, ensuring freshness and preventing spoilage. The Gamma Seal Technology, featuring a triple gasket system, seals the hopper at three critical points to lock in freshness and keep air and moisture out. This advanced storage system ensures that your pet’s food remains fresh for a longer period. The hopper’s clear design allows for easy monitoring of food levels, and its wide mouth facilitates simple filling and cleaning. With its robust construction and efficient storage solutions, the Nano feeder is perfect for pet owners who value convenience and want to maintain their pet’s food quality and freshness. This feature-rich design ensures hassle-free feeding for both you and your pet.

Compatibility with Different Pet Foods

The Gamma2 Nano Automatic Pet Feeder is versatile and compatible with a wide variety of pet foods, ensuring it meets the dietary needs of both dogs and cats. Whether you prefer dry kibble, semi-moist, or even small, freeze-dried pieces, the feeder’s design accommodates different textures and sizes. The hopper’s wide opening allows for easy loading of various food types, and the feeder’s precise dispensing mechanism ensures accurate portion control. Additionally, the feeder is designed to handle different kibble sizes without jamming, thanks to its jam-proof technology. This compatibility ensures that you can use your preferred pet food without worrying about functionality issues. The Nano feeder’s adaptability makes it a convenient solution for pet owners who want to provide their pets with a consistent and healthy diet, regardless of their food preferences or specific needs. Its universal design supports a seamless feeding experience for all pets;

Programming and Setup Instructions

Programming the Nano Automatic Pet Feeder is straightforward. Set up to 6 meal times daily, with precise portion control. Use the manual feed option for instant feeding. Follow the quick start guide for easy setup.

Setting Up Feeding Times

Setting up feeding times on the Nano Automatic Pet Feeder is a straightforward process. Start by programming the feeder using the control panel, where you can set up to 6 meal times per day. Each meal time can be customized to dispense a specific portion size, ensuring your pet receives the right amount of food at the right time. The feeder’s intuitive interface allows you to easily input the desired times and portions. Once programmed, the feeder will automatically dispense food according to the set schedule. For added convenience, the feeder includes a battery backup feature, ensuring that your programmed times are retained even during a power outage or if the unit is turned off. After setting up, always save your schedule to ensure consistent feeding. The manual feed option is also available for instant feeding outside of programmed times, providing flexibility for unexpected situations or additional treats.

Using the Manual Feed Option

The manual feed option on the Nano Automatic Pet Feeder offers flexibility and convenience for pet owners. By pressing the manual feed button, you can instantly dispense food outside of the programmed feeding schedule. This feature is especially useful for pets that require additional meals or for owners who want to reward their pets with treats. The feeder ensures a precise portion is dispensed each time, maintaining consistency in your pet’s diet. The manual feed function is easy to use and provides peace of mind when you’re away or need to adjust feeding times temporarily. Note that the manual feed option will automatically terminate after a set amount to prevent overfeeding, ensuring your pet’s health and well-being. This feature complements the programmed feeding schedule, offering a seamless and stress-free feeding experience for both you and your pet.

Customizing Portion Sizes

The Nano Automatic Pet Feeder allows for precise customization of portion sizes, ensuring your pet receives the exact amount of food needed for their health and well-being. Using the intuitive control panel, you can easily adjust the portion size for each feeding, with options ranging from 1/4 cup to larger quantities, depending on your pet’s requirements. The feeder’s advanced mechanism ensures that the selected portion is dispensed accurately, eliminating the risk of overfeeding or underfeeding. Additionally, the manual feed button provides the flexibility to dispense a set amount of food instantly, perfect for treating your pet or addressing unexpected hunger. The feeder’s digital interface makes it simple to program and adjust portion sizes, while the dual-beam weigh mechanism guarantees precise measurements. This feature is particularly useful for pets with specific dietary needs or those requiring strict portion control, making the Nano feeder a versatile and reliable solution for pet owners.

Maintenance and Troubleshooting

Regular cleaning and checking for blockages ensure smooth operation. For issues, refer to troubleshooting steps in the manual or reset the feeder by holding the feed button for 5 seconds to maintain accuracy and performance.

Cleaning the Feeder Regularly

Regular cleaning of the Nano Automatic Pet Feeder is essential to ensure proper function and prevent bacterial growth. Start by disconnecting the power source for safety. Remove and wash the food bowl and hopper with mild soap and warm water. Dry thoroughly before reassembling. Use a soft cloth to wipe down the exterior and internal mechanisms, paying attention to areas around the feeding wheel and dispensing chute. Clean the motor and sensors every two weeks to avoid dust buildup. For tough stains, a damp cloth with a gentle detergent can be used, but avoid harsh chemicals that may damage the components; Regular maintenance helps prevent clogs and ensures accurate portion control. Cleaning frequency depends on usage, but aim to sanitize all parts at least once a week. This routine will keep your feeder in optimal condition and ensure your pet’s food remains fresh and healthy.

Resolving Common Issues

If the Nano Automatic Pet Feeder malfunctions, check for simple solutions first. If the feeder stops dispensing food, ensure the hopper is not empty and the dispenser is clear of blockages. For jamming issues, switch off the device, clean the feeding mechanism, and restart. Always refer to the manual for specific instructions. If the device fails to power on, verify the battery or power cable connection. For programming errors, reset the feeder by pressing and holding the Feed button for five seconds. This will restore default settings, allowing you to reprogram feeding schedules. Regular cleaning and maintenance can prevent many common issues. If problems persist, consult the troubleshooting section in the manual or contact customer support for assistance. Keeping the feeder clean and well-maintained ensures smooth operation and reliable feeding for your pet; Always follow the manufacturer’s guidelines for resolving issues to avoid further complications.

Battery and Power Management

Proper battery and power management are essential for the Nano Automatic Pet Feeder’s reliable operation. The feeder is powered by high-quality AA batteries, which provide extended runtime and ensure continuous functionality. A battery backup feature retains the programmed feeding schedules and clock settings even during power outages, guaranteeing your pet’s meals remain on schedule. For added convenience, the feeder can also be operated using a USB power adapter, reducing battery consumption. To maintain optimal performance, replace batteries every 6-12 months or when the low-battery indicator alerts you. Avoid using low-quality batteries, as they may affect the feeder’s precision and reliability. Regularly check the power button functionality to ensure the unit turns on and off correctly. By following these guidelines, you can ensure consistent and efficient power management for your Nano Automatic Pet Feeder, providing peace of mind for pet owners. Always refer to the manual for specific battery and power-related instructions.

User Reviews and Feedback

Users praise the Nano feeder for its convenience, portion control, and ease of use. However, some report issues with programming and occasional feeding errors. Overall, satisfaction is high.

Positive Aspects Highlighted by Users

Users have shared numerous positive experiences with the Nano Automatic Pet Feeder, emphasizing its convenience, reliability, and innovative features. Many appreciate the programmable feeding schedules, which ensure pets are fed consistently even when owners are away. The portion control system has been praised for its precision, helping to maintain pets’ healthy diets. Additionally, the feeder’s ease of use and intuitive design make it a favorite among busy pet owners. The Gamma2 gasket system, which keeps food fresh, has also received positive feedback for extending the quality of stored pet food. Users also commend the manual feeding option for its flexibility and the feeder’s overall durability and jam-proof design. These features collectively contribute to a stress-free and efficient pet feeding experience, making the Nano Automatic Pet Feeder a top choice for many pet owners.

Common Complaints and Concerns

While the Nano Automatic Pet Feeder has received positive feedback, some users have raised concerns. A common issue is the inconsistency in portion sizes, with some reporting that the feeder dispenses more or less food than programmed. Others have noted difficulty in programming, particularly with setting precise feeding times and portion controls. Additionally, a few users have experienced mechanical jams, which can halt feeding sessions unexpectedly. Another concern is the lack of a battery backup, which can disrupt feeding schedules during power outages. Some users also find the manual feeding function too sensitive, leading to overfeeding. Despite these issues, many users appreciate the feeder’s overall performance and convenience. Customer support has been responsive in addressing these concerns, providing troubleshooting solutions and ensuring a better experience for pet owners.

Overall Satisfaction Ratings

The Gamma2 Nano Automatic Pet Feeder has received generally positive reviews, with many users praising its convenience and reliability. Satisfaction ratings often highlight its ease of use, precise portion control, and durable design. Pet owners appreciate how it keeps food fresh and ensures consistent feeding schedules. The manual feeding option and battery backup features are also well-received. However, some users have noted minor frustrations with programming and occasional mechanical issues. Despite this, the majority agree that the feeder enhances their pet-care routine, offering peace of mind for busy owners. Overall, the product is highly rated for its performance and value, making it a popular choice among pet enthusiasts seeking a dependable feeding solution.

Frequently Asked Questions (FAQs)

How do I reset the feeder? Press and hold the Feed button for 5 seconds until it beeps. For feeding errors, check food blockages and ensure proper setup. Always follow manual guidelines for best results.

How to Reset the Feeder

Resetting the Nano Automatic Pet Feeder is a straightforward process. Locate the Feed button on the front of the device. Press and hold it for exactly 5 seconds until you hear a beep. This action restores the feeder to its factory settings, clearing all programmed feeding schedules and times. Note that the clock time will be retained if the device has a battery backup. After resetting, reprogram the feeding times and portions as needed. Regular resets can help resolve common issues like feeding errors or synchronization problems. Ensure the feeder is turned off before resetting to avoid any interference with the process. Always refer to the manual for additional guidance if issues persist; Resetting is a useful troubleshooting step to ensure your pet’s feeding schedule remains consistent and reliable.

Troubleshooting Feeding Errors

If the Nano Automatic Pet Feeder fails to dispense food, check for blockages in the food hopper or wheel. Ensure the hopper is clean and free from debris. Verify that the food level is adequate and that the feeder is properly assembled. If the issue persists, perform a reset by holding the Feed button for 5 seconds. This will restore default settings and may resolve software glitches. Additionally, check the battery levels or power connection, as low power can disrupt feeding schedules. If the feeder still malfunctions, refer to the manual for advanced troubleshooting steps or contact customer support. Regular maintenance, such as cleaning the dispenser and ensuring proper food flow, can prevent feeding errors. Addressing issues promptly ensures your pet receives meals consistently and reliably.

Best Practices for Pet Feeding

Establishing a consistent feeding schedule is crucial for your pet’s health and routine. Use the Nano Automatic Pet Feeder to set precise meal times, ensuring your pet receives the right amount of food at the right time. Always measure and fill the hopper with high-quality pet food, avoiding moist or large kibble that may cause jams. Regularly clean the feeder to prevent bacterial growth and maintain hygiene. Monitor your pet’s food intake and adjust portion sizes as needed to prevent overfeeding or undereating. Utilize the manual feed option sparingly to avoid disrupting the programmed schedule. Store the feeder in a cool, dry place to preserve food freshness. By following these practices, you can ensure your pet enjoys a healthy, stress-free feeding experience while you’re away. Proper maintenance and adherence to guidelines will also extend the feeder’s lifespan and performance.

Integration with Smart Technology

The Nano Automatic Pet Feeder seamlessly connects to smart devices via Wi-Fi, enabling remote scheduling and monitoring through the dedicated app, ensuring convenience and control for pet owners.

App Connectivity and Remote Control

The Nano Automatic Pet Feeder offers advanced app connectivity, allowing users to manage feeding schedules, monitor food levels, and receive notifications remotely. By downloading the dedicated app, pet owners can effortlessly control the feeder via Wi-Fi, ensuring their pets are fed consistently, even when they’re not home. The app provides real-time updates, enabling users to adjust feeding times or portions instantly. Additionally, it sends alerts for low food levels or any feeding issues, giving owners peace of mind. This smart integration simplifies pet care, making it easier to maintain a routine and ensure your pet’s needs are always met. The app is user-friendly, with intuitive controls and customizable settings, ensuring a seamless experience. With remote control, the Nano feeder combines convenience with reliability, making it an ideal choice for busy pet owners.

PDF

kunuth dua pdf

Dua Qunut is a significant supplication in Islam‚ recited during specific prayers to seek Allah’s guidance and blessings. It is a heartfelt prayer that strengthens one’s connection with Allah‚ offering solace and divine assistance in times of need. Regularly practiced‚ Dua Qunut fosters spiritual growth and reliance on Allah’s mercy.

What is Dua Qunut?

Dua Qunut‚ derived from the Arabic word “قنوت” (qunūt)‚ meaning humility or standing in prayer‚ is a supplication recited in specific Islamic prayers. It serves as a direct means of communicating with Allah‚ seeking His guidance‚ mercy‚ and blessings. This prayer is not just a ritual but a heartfelt connection with the Divine‚ emphasizing reliance on Allah’s will. Recited primarily during the Fajr (Subuh) and Witr prayers‚ Dua Qunut is a powerful way to express gratitude‚ seek forgiveness‚ and request divine assistance in times of need‚ fostering spiritual growth and trust in Allah’s plan.

The Significance of Dua Qunut in Islam

Dua Qunut holds profound significance in Islam as a heartfelt supplication to seek Allah’s mercy‚ guidance‚ and blessings. It is a means of expressing humility and reliance on Allah‚ particularly during challenging times. This prayer strengthens one’s spiritual connection‚ fostering trust in Allah’s divine plan. Recited in specific prayers like Subuh and Witr‚ Dua Qunut is a powerful way to request protection‚ forgiveness‚ and assistance‚ emphasizing the believer’s dependence on Allah’s grace and mercy‚ making it a vital practice for spiritual growth and comfort.

Types of Dua Qunut

Dua Qunut is categorized into two main types: Rotibah and Nazilah. Dua Qunut Rotibah is a regular supplication recited during Subuh and Witr prayers‚ particularly in the second half of Ramadan. It focuses on seeking Allah’s blessings‚ guidance‚ and mercy. Dua Qunut Nazilah‚ however‚ is recited during times of distress‚ war‚ or oppression‚ serving as a plea for Allah’s intervention and relief. These distinctions highlight the adaptability of Dua Qunut to different spiritual and situational needs‚ making it a versatile and meaningful prayer in Islam.

Dua Qunut Rotibah

Dua Qunut Rotibah is a regular supplication recited during Subuh and Witr prayers‚ especially in Ramadan’s second half. It seeks Allah’s blessings and guidance.

Definition and Purpose

Dua Qunut Rotibah is a regular supplication recited during Subuh and Witr prayers‚ particularly in the second half of Ramadan. It serves as a direct means for Muslims to seek Allah’s guidance‚ blessings‚ and assistance. This dua is more than a prayer; it is a heartfelt connection with Allah‚ emphasizing reliance on His mercy and seeking solace in times of need. Its purpose is to strengthen faith‚ foster spiritual growth‚ and cultivate a deeper bond with the Almighty through sincere supplication.

When to Recite Dua Qunut Rotibah

Dua Qunut Rotibah is traditionally recited during the Subuh (Fajr) prayer and the Witr prayer‚ especially in the second half of Ramadan. It is a regular supplication that becomes part of the worship routine‚ fostering a consistent connection with Allah. The timing emphasizes seeking divine guidance and blessings during key moments of the day and Ramadan. Reciting it regularly strengthens faith and serves as a reminder of reliance on Allah’s mercy and support in all aspects of life.

Benefits of Reciting Dua Qunut Rotibah

Reciting Dua Qunut Rotibah offers numerous spiritual benefits‚ including strengthening one’s relationship with Allah and seeking divine guidance. It provides comfort in times of hardship‚ fostering patience and gratitude. Regular recitation helps cultivate a mindset of reliance on Allah‚ promoting inner peace and trust in His plan; This supplication is also a means to seek forgiveness and blessings‚ making it a powerful tool for personal and spiritual growth. Its regular practice enhances devotion and deepens the connection with Allah’s mercy and grace.

Dua Qunut Nazilah

Dua Qunut Nazilah is a supplication seeking Allah’s help during times of calamity or oppression. It is a powerful prayer for divine intervention and relief‚ fostering hope and trust in Allah’s mercy and justice‚ especially in challenging circumstances.

Historical Context and Meaning

Dua Qunut Nazilah holds profound historical significance‚ rooted in times of hardship and oppression. It was established as a supplication during periods of war and calamity‚ seeking Allah’s divine intervention and relief. This prayer emphasizes trust in Allah’s justice and mercy‚ fostering resilience and unity among believers. Its meaning revolves around imploring Allah’s help to overcome adversity‚ reflecting the Islamic value of reliance on divine guidance during challenging circumstances.

When to Recite Dua Qunut Nazilah

Dua Qunut Nazilah is specifically recited during times of crisis‚ war‚ or widespread calamity. It is recommended to recite it in the Witr prayer or during Taraweeh‚ especially in Ramadan. This supplication is not part of regular prayers but is invoked when seeking divine intervention for relief from oppression or hardship. Reciting it during such times strengthens the community’s collective plea for Allah’s mercy and protection. It is a powerful way to seek Allah’s help in overcoming adversity and restoring peace. The timing emphasizes its purpose as a call for divine aid in extraordinary circumstances.

Benefits of Reciting Dua Qunut Nazilah

Reciting Dua Qunut Nazilah offers profound spiritual and emotional benefits‚ particularly during challenging times. It serves as a means to seek Allah’s divine help‚ protection‚ and relief from oppression. This supplication strengthens one’s faith‚ fostering a deeper connection with Allah. It also provides comfort and solace‚ helping believers navigate hardships with patience and trust in Allah’s wisdom. Additionally‚ Dua Qunut Nazilah unites the community in collective prayer‚ amplifying the plea for mercy and divine intervention. Its recitation is a powerful reminder of Allah’s sovereignty and grace in times of need;

How to Recite Dua Qunut

To recite Dua Qunut‚ prepare with proper intention and wudu. Recite it after the third rak’ah in Subuh or during Witr in Ramadan. Focus and sincerity are essential.

Step-by-Step Guide to Reciting Dua Qunut

Begin with proper wudu and a sincere intention. Stand in prayer‚ facing the Ka’bah. After the third rak’ah in Subuh or during Witr‚ raise your hands. Recite the Dua Qunut in Arabic with correct pronunciation. Focus on the meaning‚ seeking Allah’s guidance and mercy. Maintain humility and concentration. Conclude by seeking Allah’s blessings and protection. Ensure your heart is present‚ reflecting on the words’ significance. This practice strengthens your spiritual connection and deepens your reliance on Allah’s divine support.

Recommended Times for Recitation

Dua Qunut is ideally recited during Subuh (Fajr) prayer and the Witr prayer‚ particularly in the second half of Ramadan. It is also recommended during times of distress or calamity‚ as it seeks Allah’s intervention. Regular recitation fosters a deeper connection with Allah and provides spiritual solace. Additionally‚ Dua Qunut can be incorporated into Taraweeh prayers for enhanced devotion. Reciting it consistently strengthens faith and invites divine mercy‚ making it a powerful practice for seeking guidance and relief in all circumstances.

Etiquettes of Reciting Dua Qunut

Reciting Dua Qunut with sincerity and focus is essential. It is important to maintain proper Arabic pronunciation to ensure the supplication’s authenticity. One should avoid distractions during recitation‚ concentrating solely on seeking Allah’s guidance. The intention behind the dua should be pure‚ aiming for divine help and blessings. Reciting it with a calm and humble heart enhances its impact. Additionally‚ understanding the meaning of the words deepens the spiritual connection‚ making the act of supplication more meaningful and effective.

The Power of Dua Qunut

Dua Qunut holds profound spiritual power‚ offering solace and divine assistance. It strengthens faith‚ transforms lives‚ and fosters reliance on Allah’s mercy‚ guiding believers through life’s challenges.

Seeking Allah’s Guidance and Help

Dua Qunut serves as a direct means to seek Allah’s guidance and assistance. It is a powerful supplication that Muslims recite to invoke divine help‚ especially during challenging times. By expressing humility and faith‚ believers connect deeply with Allah‚ seeking His mercy and wisdom. This prayer is not just a request but a reaffirmation of trust in Allah’s plan‚ fostering spiritual strength and resilience in the face of adversity. Regular recitation ensures a steadfast reliance on His guidance and support.

Transforming Life Through Dua Qunut

Dua Qunut is a transformative supplication that brings profound change to one’s life. By reciting it with sincerity‚ individuals can experience spiritual growth‚ mental clarity‚ and emotional stability. It helps believers develop a deeper connection with Allah‚ fostering reliance on His wisdom and mercy. Regular practice of Dua Qunut equips one with the strength to navigate life’s challenges‚ fostering resilience and trust in divine guidance. This prayer is a powerful tool for personal transformation‚ enabling individuals to face adversity with confidence and faith in Allah’s plan.

Stories of People Who Benefited from Dua Qunut

Many believers have shared heartfelt stories of how Dua Qunut transformed their lives. One individual recounted finding peace after reciting it during a family conflict‚ restoring harmony and strengthening faith. Another shared how Dua Qunut provided clarity during a critical decision‚ guiding them toward the right path. These stories highlight the profound impact of Dua Qunut in times of need‚ demonstrating its power to bring solace‚ guidance‚ and strength. Such accounts inspire others to embrace this prayer‚ trusting in Allah’s mercy and wisdom.

Dua Qunut in Different Prayers

Dua Qunut is an integral part of various Islamic prayers‚ enhancing their spiritual significance. It is commonly recited in Subuh‚ Witr‚ and Taraweeh prayers‚ serving as a means to seek Allah’s blessings and guidance in different worship settings.

Dua Qunut in Subuh Prayer

Dua Qunut is often recited during the Subuh prayer‚ particularly after the Al-Fatihah and before the second rak’ah. This practice is deeply rooted in Islamic tradition‚ as it is believed to enhance the spiritual connection with Allah. The supplication is a means to seek divine guidance‚ forgiveness‚ and protection from harm. Reciting Dua Qunut in Subuh is also seen as a way to begin the day with a heartfelt plea to Allah‚ ensuring His blessings and mercy are sought from the earliest moments of dawn.

Dua Qunut in Witr Prayer

Dua Qunut is recommended to be recited during the Witr prayer‚ especially in the second half of Ramadan. This prayer is a unique opportunity to seek Allah’s forgiveness and mercy. Reciting Dua Qunut in Witr is a Sunnah practice‚ emphasizing the importance of humility and devotion. It serves as a powerful means to connect with Allah‚ expressing gratitude and seeking blessings; Many scholars highlight the spiritual rewards of incorporating Dua Qunut in Witr‚ making it a cherished moment for believers to strengthen their faith and seek divine guidance.

Dua Qunut in Taraweeh Prayers

Dua Qunut is often recited during Taraweeh prayers‚ particularly in the later nights of Ramadan. This practice is a beautiful way to enhance the spiritual experience of Taraweeh‚ deepening one’s connection with Allah. Reciting Dua Qunut during these congregational prayers fosters unity among worshippers and amplifies the communal plea for divine mercy. Many mosques incorporate Dua Qunut into their Taraweeh rituals‚ making it a cherished tradition that resonates with the essence of Ramadan—seeking forgiveness‚ guidance‚ and blessings collectively.

Common Mistakes in Reciting Dua Qunut

Common errors include mispronouncing Arabic words and rushing through the supplication. Ensuring proper articulation and maintaining a steady pace are essential for correct recitation and sincerity.

Understanding the Correct Arabic Pronunciation

Mastering the correct Arabic pronunciation of Dua Qunut is crucial for its effectiveness. Many believers struggle with proper articulation of certain letters and words‚ which can alter the meaning. For instance‚ the “ق” sound in “Qunut” must be pronounced correctly to maintain the supplication’s integrity.

Practicing with a qualified teacher or reliable audio resources can help avoid common mistakes. Consistent practice ensures that the words are recited as intended‚ preserving the supplication’s spiritual impact and fulfilling the ritual’s requirements faithfully.

Avoiding Distractions During Recitation

To fully benefit from Dua Qunut‚ it’s essential to avoid distractions and maintain focus; Choose a quiet‚ calm environment where interruptions are minimized. Turn off electronic devices and ensure privacy.

Sincerity and concentration are vital‚ as Dua Qunut is a personal conversation with Allah. Avoid multitasking or rushing through the supplication. Prepare mentally before reciting‚ clearing your mind of worldly concerns. By minimizing distractions‚ you ensure your supplication is heartfelt and effective‚ fostering a deeper connection with Allah.

Maintaining Focus and Sincerity

Maintaining focus and sincerity is crucial when reciting Dua Qunut. Prepare mentally by understanding the meaning of the words‚ ensuring your heart is fully engaged. Avoid distractions by choosing a quiet‚ calm environment and minimizing interruptions. Recite with humility‚ acknowledging Allah’s mercy and power. Sincerity strengthens the connection with Allah‚ making the supplication more impactful. By fostering focus and genuine intent‚ you align your heart and mind‚ seeking divine guidance and blessings with utmost devotion. This practice nurtures spiritual growth and deepens your relationship with Allah.

Historical and Cultural Significance

Dua Qunut holds profound historical and cultural value‚ rooted in Islamic traditions and practiced across generations. It reflects the community’s collective appeal for divine mercy and protection‚ embodying the Islamic spirit of unity and faith.

Dua Qunut in Islamic History

Dua Qunut has deep roots in Islamic history‚ often recited during times of hardship and war. Scholars like Imam Bukhari and Abdullah ibn Mubarak emphasized its significance. Historical records show its use in seeking divine help against oppression‚ as mentioned in Quranic references. Over centuries‚ it has remained a powerful supplication‚ adapting to communal needs while preserving its core purpose. Its inclusion in madrasah curricula highlights its enduring role in Islamic education and cultural practices‚ ensuring its transmission to future generations.

Cultural Practices Surrounding Dua Qunut

Dua Qunut is deeply embedded in Islamic cultural practices‚ often taught in madrasahs worldwide. It is frequently recited in congregational prayers‚ fostering a sense of unity among believers. Many communities incorporate it into special prayers during Ramadan‚ particularly in Witr and Taraweeh. Cultural practices also include teaching Dua Qunut to children as part of their Islamic education. Its recitation is often emphasized during times of collective hardship‚ serving as a communal plea for divine relief and strength. This practice underscores its enduring cultural and spiritual significance in Muslim societies globally.

Modern-Day Relevance of Dua Qunut

Dua Qunut remains highly relevant today‚ serving as a powerful tool for seeking Allah’s assistance in modern challenges. It is widely recited during times of crisis‚ such as natural disasters or social injustices‚ to invoke divine relief. The supplication is also shared online‚ with many resources and guides available for learning and recitation. Its relevance extends to personal struggles‚ offering comfort and strength. Modern Muslims continue to embrace Dua Qunut as a timeless prayer‚ adapting its practice to contemporary needs while maintaining its spiritual essence and universal appeal.

Teaching Dua Qunut to Others

Teaching Dua Qunut is a noble act that spreads spiritual knowledge and strengthens community bonds. It involves patience‚ clear instruction‚ and encouraging learners to practice regularly for deeper understanding and connection.

Methods for Effective Teaching

Effective teaching of Dua Qunut involves breaking down the Arabic text into simpler phrases for easier understanding. Teachers should demonstrate proper pronunciation and encourage students to practice regularly. Using step-by-step guides and visual aids can enhance learning. Group recitation fosters a sense of community and mutual encouragement. Providing access to reliable PDF resources ensures learners can review at home. Incorporating stories and cultural significance can deepen appreciation. Positive reinforcement and feedback help students stay motivated and confident in their recitation.

Importance of Passing Down the Knowledge

Passing down the knowledge of Dua Qunut is vital for preserving Islamic heritage and ensuring its continued practice across generations. It strengthens community bonds and fosters spiritual growth. By teaching others‚ we uphold the legacy of our Prophet (ﷺ) and honor the traditions of esteemed scholars. Sharing this knowledge also empowers individuals to seek Allah’s guidance and blessings in their daily lives. It is a collective responsibility to ensure Dua Qunut remains a cherished and integral part of Muslim worship and identity.

Engaging Children in Learning Dua Qunut

Engaging children in learning Dua Qunut is essential for nurturing their spiritual growth. Parents and teachers should use simple‚ age-appropriate explanations and visual aids to make the process enjoyable. Breaking down the Dua into smaller parts and practicing regularly can help children memorize it effectively. Encouraging participation in family prayers and creating a routine for recitation fosters a sense of responsibility. Making it interactive‚ such as through competitions or rewards‚ can also motivate them. Starting early and being patient ensures they develop a lifelong connection to this beautiful supplication.

Downloading the PDF Guide

A reliable PDF guide on Dua Qunut can be found on trusted Islamic websites‚ ensuring authenticity and proper understanding. Download it for personal or educational use.

Where to Find Reliable Sources

Reliable PDF guides on Dua Qunut can be found on trusted Islamic websites‚ such as those affiliated with reputable Islamic organizations or scholarly platforms. Ensure the source is verified for authenticity by checking endorsements from credible Islamic scholars or institutions. Websites like yaqeeninstitute.org and publications from organizations such as the Islamic Society of North America (ISNA) often provide well-researched and authentic content. Always verify the credibility of the publisher before downloading to ensure the guide aligns with Islamic teachings and traditions.

Verifying the Authenticity of the PDF

To ensure the PDF guide on Dua Qunut is authentic‚ verify its endorsements from credible Islamic scholars or institutions. Cross-check the content with the Quran‚ Hadith‚ and scholarly interpretations. Look for references to trusted sources like yaqeeninstitute.org or publications from reputable organizations such as the Islamic Society of North America (ISNA). Avoid PDFs with unverified publishers or inconsistent information. Ensure the Arabic text is accurately presented and the translations align with Islamic teachings. This careful verification ensures the guide is reliable and spiritually beneficial.

Using the PDF for Personal and Educational Purposes

The Dua Qunut PDF serves as an invaluable resource for both personal and educational use. Individuals can use it as a guide for daily reflection‚ ensuring accurate recitation and understanding. Educators can incorporate it into Islamic studies curricula‚ teaching students the significance and proper recitation of Dua Qunut. The PDF can also be shared in community settings‚ fostering collective learning and spiritual growth. Its structured format makes it an accessible tool for personal worship and teaching environments‚ ensuring the tradition of Dua Qunut is preserved and passed on effectively.

Dua Qunut is a powerful supplication that strengthens one’s connection with Allah‚ offering guidance‚ blessings‚ and solace. Regular practice fosters spiritual growth and reliance on divine mercy.

Final Thoughts on the Importance of Dua Qunut

Dua Qunut serves as a profound bridge between the believer and Allah‚ offering solace‚ guidance‚ and divine assistance. It embodies the essence of surrender and trust in Allah’s mercy‚ providing comfort in times of distress. By reciting Dua Qunut‚ one nurtures a deeper spiritual connection‚ fostering reliance on Allah’s grace. This timeless practice not only strengthens faith but also empowers individuals to seek blessings and wisdom. It remains a cherished supplication‚ deeply rooted in Islamic tradition‚ inspiring believers to embrace humility and gratitude in their daily lives and challenges.

Encouragement to Practice Dua Qunut Regularly

Embracing Dua Qunut as a regular practice nurtures a deeper connection with Allah‚ offering comfort and guidance in life’s challenges. It serves as a powerful means to seek divine intervention‚ fostering reliance on Allah’s mercy. Consistent recitation of Dua Qunut transforms one’s spiritual journey‚ providing solace during hardships and strengthening faith. Encourage yourself and others to practice it sincerely‚ trusting in Allah’s grace and wisdom. Regular practice not only enriches personal worship but also becomes a source of inspiration and strength in daily life.

PDF

vsepr practice problems with answers pdf

VSEPR (Valence Shell Electron Pair Repulsion) theory explains molecular geometry by electron repulsion. It predicts shapes like linear, trigonal, or octahedral, helping students understand molecular structures through practice problems.

1.1 What is VSEPR Theory?

VSEPR (Valence Shell Electron Pair Repulsion) theory explains how electrons around a central atom arrange themselves to minimize repulsion. These arrangements determine molecular geometry. It considers bonding and non-bonding electron pairs, predicting shapes like linear, trigonal planar, or octahedral. By understanding electron distribution, VSEPR helps predict molecular structures, aiding in visualizing and analyzing compounds effectively. This fundamental concept is crucial for chemistry students to master molecular shapes and bonding patterns.

1.2 Importance of VSEPR in Molecular Geometry

VSEPR theory is crucial for predicting molecular geometry, which determines physical and chemical properties. Understanding electron repulsion patterns helps explain bond angles and molecular shapes, aiding in visualizing structures. This knowledge is essential for analyzing reactivity, polarity, and spectroscopic properties. By mastering VSEPR, students can accurately predict and draw molecular shapes, enhancing their grasp of chemistry concepts and solving practical problems effectively. Regular practice with problems ensures proficiency in applying the theory to diverse molecules and ions.

Basic Concepts of VSEPR Theory

VSEPR theory centers on electron pair repulsion, shaping molecular geometry. It involves bonding and lone electron pairs, dictating bond angles and molecular shapes through repulsion forces.

2.1 Electron Pairs and Their Repulsion

Electron pairs, both bonding and non-bonding, repel each other due to negative charges. This repulsion dictates molecular geometry, as electrons seek maximum distance apart. VSEPR problems involve identifying these pairs to predict shapes like trigonal planar or octahedral. Practice exercises, often found in PDF resources, help students master electron pair behavior and its impact on molecular structures. These concepts are fundamental for understanding how electron repulsion influences bond angles and molecular stability. Regular practice with such problems enhances conceptual clarity and application skills.

2.2 Bonding and Non-Bonding Electron Pairs

Bonding electron pairs form covalent bonds between atoms, while non-bonding pairs (lone pairs) are unshared electrons. Both types repel each other, influencing molecular geometry. In VSEPR practice problems, identifying these pairs is crucial for predicting shapes. For example, SO₂ has bonding pairs forming double bonds, while NH₃ has lone pairs affecting its geometry. Understanding the distinction between bonding and non-bonding pairs is essential for mastering molecular structure predictions and solving practice problems effectively. Regular practice with such exercises enhances this skill.

2.3 Lone Pairs and Their Impact on Geometry

Lone pairs significantly influence molecular geometry due to their strong repulsion effects. Unlike bonding pairs, lone pairs occupy more space, distorting bond angles. In VSEPR practice problems, molecules like NH₃ and H₂O show reduced bond angles compared to ideal tetrahedral shapes because of lone pair repulsion. This concept is vital for accurately predicting molecular shapes and solving geometry-related questions in practice exercises, ensuring a deeper understanding of VSEPR theory applications in real molecules. Regular practice helps solidify this knowledge.

Molecular Geometries Predicted by VSEPR

VSEPR theory predicts molecular geometries such as linear, trigonal planar, tetrahedral, trigonal bipyramidal, and octahedral shapes. These geometries arise from electron repulsion and bonding patterns, guiding practice problems.

3.1 Linear Geometry

Linear geometry occurs when a molecule has a 180-degree bond angle, typically with two bonding regions and no lone pairs on the central atom. CO₂ and O=C=O are examples. This shape maximizes electron pair separation, minimizing repulsion. Practice problems often include identifying linear structures, such as in BeCl₂ or CO₂, requiring students to apply VSEPR theory to predict and verify geometries. These exercises enhance understanding of molecular shapes and electron interactions.

3.2 Trigonal Planar Geometry

Trigonal planar geometry results from three bonding regions and no lone pairs, creating 120-degree bond angles. Examples include BF₃ and NO₃⁻. This shape minimizes electron repulsion, with each region spaced equally. Practice problems often involve identifying trigonal planar molecules, such as SO₃²⁻ or CO₃²⁻, and applying VSEPR theory to predict their shapes. These exercises help students understand how electron distribution influences molecular geometry and bond angles. They are essential for mastering VSEPR concepts.

3.3 Tetrahedral Geometry

Tetrahedral geometry occurs with four bonding regions and no lone pairs, forming approximately 109.5-degree angles. Molecules like CH₄ and NH₄⁺ exhibit this shape. Practice problems often involve identifying tetrahedral structures, such as SF₄ or XeF₄, and applying VSEPR theory to predict their geometries; These exercises help students understand how electron distribution and bonding regions influence molecular shapes. They are crucial for mastering VSEPR principles and predicting molecular structures accurately; Regular practice enhances problem-solving skills.

3.4 Trigonal Bipyramidal Geometry

Trigonal bipyramidal geometry arises when a central atom has five bonding regions, typically with no lone pairs. This arrangement results in bond angles of 90° and 120°. Common examples include PF₅ and BrF₅. Practice problems often involve identifying such structures and applying VSEPR theory to predict their shapes. These exercises help students grasp how electron distribution influences molecular geometry. Regular practice with trigonal bipyramidal molecules enhances understanding of VSEPR principles and improves accuracy in predicting complex molecular structures.

3.5 Octahedral Geometry

Octahedral geometry occurs when a central atom has six electron regions, typically with no lone pairs. Bond angles are 90°, and examples include SF₆ and XeF₆. Practice problems often involve determining the geometry of molecules like IOF₅ and XeF₄, enhancing understanding of VSEPR theory. These exercises help students master molecular geometry by applying theoretical knowledge to real-world examples, ensuring accurate predictions for complex structures. Regular practice with octahedral molecules strengthens proficiency in VSEPR-based problem-solving.

Practice Problems with Answers

Practice problems with answers are essential for mastering VSEPR theory. They range from basic to advanced, covering molecules like HOCl, SF₄, and XeF₄. These exercises help students predict molecular geometries accurately and understand the impact of lone pairs and electron repulsion on shapes. Solutions provide clear explanations, reinforcing learning and improving problem-solving skills for complex molecular structures. Regular practice enhances conceptual understanding and application of VSEPR theory.

4.1 Basic VSEPR Practice Problems

Basic VSEPR practice problems introduce students to predicting molecular geometries using Lewis structures. Common problems involve molecules like SO₂, CO₃²⁻, and NH₃, focusing on understanding electron pair repulsion and bond angles. Students learn to identify AXE notation, determine if lone pairs are present, and predict shapes like linear, trigonal planar, or tetrahedral. These exercises build foundational skills for more complex molecules, ensuring a solid grasp of VSEPR theory’s application in molecular geometry. Regular practice helps students master these concepts effectively.

4.2 Intermediate-Level Problems

Intermediate VSEPR problems challenge students to analyze molecules with multiple bonding and non-bonding electron pairs. Examples include SF₄, ClF₃, and XeF₄, requiring application of VSEPR theory to predict geometries like seesaw, T-shaped, and square planar. These problems test the ability to handle expanded valence shells and complex lone pair interactions. Detailed solutions guide students through each step, helping refine their understanding and accuracy in predicting molecular shapes for diverse chemical structures. Regular practice at this level enhances analytical and problem-solving skills.

4.3 Advanced VSEPR Challenges

Advanced VSEPR problems involve complex molecules with unusual geometries, such as IOF₅, BrO₃⁻, or XeF₄. These challenges require analyzing molecules with multiple lone pairs, expanded valence shells, or deviations from idealized shapes. Students must apply VSEPR theory to predict and explain geometries like square planar or distorted octahedral. Solutions often involve detailed hybridization and resonance discussions, ensuring a deep understanding of molecular structure and its exceptions. These problems prepare students for real-world chemical analysis and research applications.

Solving VSEPR Practice Problems

Solving VSEPR problems involves identifying electron pairs, predicting molecular geometry, and verifying with examples. Regular practice enhances understanding of molecular shapes and exceptions, improving predictive skills effectively.

5.1 Drawing Lewis Structures

Drawing Lewis structures is the first step in applying VSEPR theory. It involves determining valence electrons, placing atoms, and distributing electrons to form bonds and lone pairs. Accuracy is crucial as incorrect structures lead to wrong geometry predictions. Practice problems often include molecules like CO3^2- or SO2, requiring attention to formal charges. Using online tools or simulations can aid in visualizing and verifying these structures effectively for better mastery of molecular geometry concepts.

5;2 Applying VSEPR Theory

After drawing Lewis structures, VSEPR theory is applied to predict molecular geometry. This involves identifying the central atom’s electron domains, bonding pairs, and lone pairs. The repulsion between these domains determines the shape. For example, four domains with no lone pairs result in a tetrahedral geometry, while one lone pair leads to a trigonal pyramidal shape. Practice problems, such as those involving SF4 or NH3, help students master this step, ensuring accurate predictions of molecular shapes based on electron repulsion principles.

5.3 Comparing Predictions with Examples

Comparing theoretical predictions with real molecular structures validates VSEPR theory. For instance, BF3 is trigonal planar due to three bonding pairs, while ClF3 adopts a T-shape because of lone pairs. Such comparisons highlight how electron repulsion dictates geometry. Practice problems with examples like SF4 (seesaw) and XeF4 (square planar) help students grasp these concepts, ensuring their predictions align with actual molecular shapes observed in experiments and simulations.

Common Exceptions and Unusual Cases

Certain molecules, like SF4 (seesaw) and XeF4 (square planar), deviate from VSEPR predictions due to lone pairs and expanded valence shells, highlighting unusual geometries.

6.1 Molecules with Expanded Valence Shells

Molecules like SF4 and XeF4 exhibit expanded valence shells, allowing more than eight electrons around the central atom. This results in unique geometries such as seesaw and square planar shapes. These cases, where d-orbitals are utilized, demonstrate exceptions to traditional VSEPR predictions. Expanded valence shells often occur in period 3 elements and beyond, enabling hypervalent structures. These molecules highlight the importance of considering atomic size and orbital availability in molecular geometry. Such exceptions are crucial for mastering VSEPR theory and solving complex practice problems.

6.2 Impact of lone pairs on Geometry

6.2 Impact of Lone Pairs on Geometry

Lone pairs significantly influence molecular geometry due to their strong repulsive effects. For instance, in molecules like NH3 and H2O, lone pairs occupy more space than bonding pairs, leading to distorted geometries. This repulsion causes bond angles to deviate from idealized VSEPR predictions, such as the 107.5° angle in NH3 instead of the tetrahedral 109.5°. Understanding lone pair effects is essential for accurately predicting molecular shapes and solving practice problems involving VSEPR theory.

Resources for VSEPR Practice

Recommended textbooks and online simulations provide comprehensive resources for VSEPR practice. Utilize molecular modeling tools and PDF guides to enhance understanding and solve problems effectively.

7.1 Recommended Textbooks

Textbooks like “Chemistry 2e” by OpenStax offer detailed chapters on VSEPR theory with practice problems. They include explanations of bonding, hybridization, and molecular geometry, making them excellent resources for students seeking to master VSEPR concepts through structured exercises and real-world examples.

7.2 Online Simulations and Tools

Online simulations like molecular modeling tools provide interactive 3D visualizations of molecular structures, aiding in understanding VSEPR theory. Platforms offer practice exercises with answers, allowing students to test their knowledge and refine their skills. These resources complement textbooks, offering dynamic learning experiences for visual and kinesthetic learners. Utilizing such tools enhances understanding of molecular geometries and their predictions based on VSEPR principles.

Where to Find VSEPR Practice Problems with Answers PDF

Find VSEPR practice problems with answers in PDF format on university websites, educational platforms, and online repositories. These resources are freely downloadable for chemistry students.

8.1 Websites Offering Free PDF Resources

Websites like OpenStax and educational platforms provide free PDF resources for VSEPR practice problems. These materials include detailed exercises and solutions, covering various molecular geometries. They are accessible for students to download and practice, aiding in understanding and applying VSEPR theory effectively for exams and assignments. These resources are updated regularly to ensure relevance and comprehensiveness in chemistry education.

8.2 University and Course Websites

University websites often provide free VSEPR practice problems with answers in PDF format. Platforms like UC Berkeley and MIT OpenCourseWare offer comprehensive resources for students. These documents include Lewis structures, AXE formulas, and geometry predictions. They are ideal for self-study and exam preparation, ensuring students grasp molecular shapes and bonding theories effectively. These resources are regularly updated to align with modern curriculum standards.

Mastering VSEPR theory through practice problems enhances understanding of molecular geometry. Utilize provided PDF resources to refine skills in predicting shapes and bonding patterns effectively.

9.1 Summary of Key Points

VSEPR theory is essential for predicting molecular geometry by considering electron repulsion. Practice problems with answers, especially in PDF format, help reinforce understanding of bonding and geometry. These resources cover various molecules, from simple to complex, and include visual aids for better comprehension. Utilizing these tools enhances problem-solving skills and mastery of molecular structures. Regular practice with provided answers ensures accuracy and confidence in applying VSEPR principles to real-world chemical scenarios.

9.2 Final Tips for Mastering VSEPR

To master VSEPR, practice consistently with problems, starting with basic structures and progressing to complex molecules. Begin by drawing accurate Lewis structures, then apply VSEPR theory to predict geometries. Use online simulations to visualize molecular shapes. Review mistakes to understand common pitfalls. Focus on understanding electron pair repulsion and its impact on bond angles. Seek additional resources, such as textbooks or PDF guides, for in-depth practice. Regularly test yourself with problems covering various molecular formulas to build confidence and proficiency in predicting geometries accurately.

Additional Reading

Explore books on molecular geometry and research journals for deeper insights into VSEPR theory and advanced applications in understanding molecular structures and chemical bonding.

10.1 Books on Molecular Geometry

Books on molecular geometry provide detailed insights into molecular structures and bonding. Titles like Chemistry Workbook For Dummies offer practice problems and exercises to master VSEPR theory. OpenStax’s Chemistry 2e is another excellent resource, covering electron pair repulsion and hybridization. These books are ideal for students and educators seeking to understand molecular shapes and bonding principles deeply. They offer comprehensive explanations and practical examples, making complex concepts accessible and engaging.

10.2 Journals and Research Articles

Journals and research articles provide in-depth explorations of molecular geometry and VSEPR theory. Resources like Solved VSEPR Theory MCQ Free PDF offer practice questions and answers, enhancing understanding. Peer-reviewed articles from platforms like OpenStax and Khan Academy videos complement textbook learning. These materials often include case studies and cutting-edge research, helping students and educators master complex geometries and electron pair repulsion concepts. They serve as invaluable tools for advancing knowledge in molecular structure and bonding theories.