
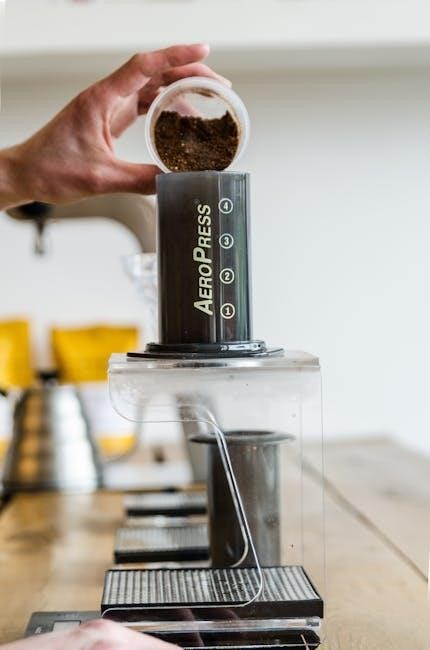
The Aeropress is a manually operated coffee brewing device that uses air pressure to extract flavors from ground coffee‚ resulting in smooth‚ full-bodied beverages․ This guide provides step-by-step instructions to help you master the Aeropress‚ from preparation to pressing‚ ensuring perfect brews every time․
Overview of the Aeropress
The Aeropress is a handheld coffee brewing device that combines the benefits of immersion‚ air pressure‚ and filtration to produce smooth‚ full-bodied coffee․ Its unique design allows for versatile brewing methods‚ from classic American-style coffee to rich espresso․ Unlike traditional coffee makers‚ the Aeropress is portable‚ easy to clean‚ and requires no electricity․ It consists of two main chambers: one for brewing and one for pressing․ The device is durable‚ lightweight‚ and compact‚ making it ideal for both home use and travel․ With its intuitive design‚ the Aeropress empowers users to experiment with various brewing techniques‚ ensuring a perfect cup every time․
Benefits of Using an Aeropress
The Aeropress offers numerous advantages for coffee enthusiasts․ Its unique air-pressure brewing method results in smooth‚ full-bodied coffee without bitterness; It is highly versatile‚ allowing users to brew both American-style coffee and rich espresso․ The device is portable‚ making it ideal for travel‚ and requires no electricity‚ ensuring convenience anywhere․ Cleaning is straightforward‚ and its durable design guarantees long-term use․ Unlike other brewers‚ the Aeropress allows for precise control over brewing parameters‚ enabling customization to suit individual preferences․ Its compact size and lightweight construction make it easy to store and transport․ Overall‚ the Aeropress combines simplicity‚ flexibility‚ and quality‚ making it a favorite among coffee lovers of all skill levels․
Materials Needed for Brewing
To brew with an Aeropress‚ you’ll need the Aeropress chamber‚ plunger‚ filter‚ and stirrer․ Additional tools include a coffee grinder‚ scale‚ kettle‚ and a sturdy mug․
Components of the Aeropress
The Aeropress consists of a cylindrical chamber‚ a plunger with a rubber seal‚ a filter cap‚ and a set of paper filters․ The chamber is where the coffee grounds and water mix‚ while the plunger is used to press the mixture‚ separating the liquid from the solids․ The filter cap attaches to the chamber and holds the paper filter in place‚ ensuring clean extraction․ Additional components include a stirrer for mixing and a funnel for easy pouring․ These parts work together to create a smooth‚ full-bodied coffee․ Regular cleaning and care for each component are essential for optimal performance and longevity of the device․
Additional Tools Required
To brew with an Aeropress‚ you’ll need a few additional tools beyond the device itself․ A coffee grinder is essential for freshly grinding your beans to the ideal consistency․ A scale is useful for measuring precise amounts of coffee and water‚ ensuring consistency in your brew․ A kettle is necessary for heating water to the optimal temperature․ Some users also find a stirrer helpful for mixing the grounds and water evenly․ While these tools enhance the brewing experience‚ they are not all strictly required‚ allowing you to adapt the process to your available equipment․ This setup ensures you can customize your brewing method to suit your preferences and resources․
Step-by-Step Brewing Guide
This guide outlines the essential steps for brewing coffee with an Aeropress‚ from preparing the device to pressing and serving․ Follow each step carefully for optimal results․
Preparation Steps
Begin by gathering all necessary tools and ingredients‚ including the Aeropress‚ coffee beans‚ water‚ a grinder‚ and a scale․ Rinse the Aeropress filter with hot water to ensure cleanliness and prevent paper flavors․ Place the inverted Aeropress on the scale and tare it․ Measure 14g of coffee‚ grind it to a medium-fine consistency‚ and pour it into the chamber․ Start your timer and pour a small amount of hot water to saturate the grounds․ Allow the coffee to bloom briefly before adding the remaining water․ Ensure the Aeropress is properly sealed and ready for pressing․ Proper preparation is key to achieving the perfect brew;
The Inverted Brewing Method
The inverted method involves placing the Aeropress plunger upside down‚ creating a vacuum seal that allows for even extraction․ Start by grinding your coffee to a medium-fine grind and placing it in the inverted chamber․ Pour hot water over the grounds‚ ensuring saturation․ Allow the mixture to steep for 1-2 minutes‚ depending on desired strength․ After steeping‚ carefully place the plunger on top and slowly press down‚ applying gentle pressure until resistance is met․ This method ensures a smooth‚ espresso-style brew by preventing under-extraction and channeling․ The inverted technique is favored for its rich‚ full-bodied results and is ideal for those who prefer a stronger cup․
Standard Brewing Method
Begin by placing the Aeropress chamber on a sturdy mug with the filter attached․ Add your ground coffee‚ ensuring an even layer․ Pour hot water in a circular motion to saturate all grounds․ Stir gently to promote even extraction‚ then allow the mixture to brew for 1-2 minutes․ Place the plunger slowly into the chamber‚ pressing downward with steady‚ gentle pressure until you feel resistance․ Stop pressing once you hear a faint hissing sound‚ indicating all liquid has been extracted․ Serve immediately for a balanced‚ smooth cup of coffee․ This method is ideal for those seeking a classic Aeropress experience with minimal effort and cleanup․
Pressing and Serving
Once the brewing process is complete‚ carefully position the plunger into the Aeropress chamber‚ ensuring it aligns smoothly․ Press down gently but firmly; avoid applying too much force‚ as this can cause the coffee to become over-extracted or bitter․ Continue pressing until you hear a gentle hissing sound‚ indicating all the liquid has been extracted․ Remove the plunger and pour the freshly brewed coffee into your cup immediately․ For an enhanced experience‚ you can add milk‚ sugar‚ or other preferred flavorings․ Always use a sturdy mug to prevent spills and handle the Aeropress with care to avoid any accidental breakage․ This step ensures your coffee is served perfectly every time‚ maintaining its rich flavor and aroma․

Understanding Grind Size
Grind size is a critical factor in coffee brewing‚ affecting extraction and flavor․ Fine‚ medium‚ or coarse grinds suit different methods‚ with Aeropress requiring a medium-fine grind for optimal results․

Importance of Grind Size
Grind size plays a crucial role in coffee brewing‚ as it directly impacts extraction efficiency and flavor profile․ A grind that is too fine can lead to over-extraction‚ resulting in a bitter taste‚ while a grind that is too coarse may cause under-extraction‚ producing a weak or sour coffee․ For the Aeropress‚ achieving the optimal grind size ensures a balanced extraction‚ bringing out the full potential of your coffee beans․ Proper grind size also prevents clogging during the pressing process and allows for a smooth‚ even flow of air pressure․ Experimenting with grind sizes can help you tailor the flavor to your preferences‚ making it a key factor in perfecting your brew․
Recommended Grind for Aeropress
The ideal grind size for the Aeropress is medium to medium-fine‚ similar to fine sand or granulated sugar․ This consistency allows for optimal extraction and ensures the air pressure can flow smoothly during brewing․ A grind that is too fine may lead to clogging or over-extraction‚ while a coarse grind can result in under-extraction․ For the standard Aeropress method‚ a medium-fine grind is recommended‚ but you can adjust it slightly depending on your desired brewing style․ Using a burr grinder is advised for consistent results‚ as blade grinders can create uneven particles․ Experiment with small adjustments to find the perfect grind for your preferred flavor profile․

Water Temperature Guidelines
The optimal water temperature for brewing with an Aeropress is between 195°F and 205°F‚ just below boiling point․ Use a thermometer for precise measurement to ensure ideal extraction․
Optimal Temperature for Brewing
The ideal water temperature for brewing with an Aeropress is between 195°F and 205°F‚ just below boiling point․ Using a thermometer ensures precise control‚ but if unavailable‚ let boiling water cool for 30 seconds; This range prevents under-extraction (too cool) or over-extraction (too hot)‚ balancing flavors․ Aim for consistency to achieve the best results․ Proper temperature is critical for bringing out the coffee’s nuances without bitterness or sourness․ Always preheat the Aeropress and cup to avoid heat loss during brewing․ Maintaining this temperature range is key to unlocking the full potential of your coffee beans and enjoying a perfectly brewed cup every time․
How to Measure Water Temperature
Accurately measuring water temperature is essential for optimal brewing․ Use a digital thermometer to ensure water reaches between 195°F and 205°F․ If a thermometer isn’t available‚ boil water and let it sit for 30 seconds to 1 minute․ This method cools the water slightly‚ approaching the ideal range․ Always preheat your Aeropress and cup to prevent heat loss during brewing․ For precise control‚ invest in a thermometer‚ as it simplifies achieving the perfect temperature consistently․ Proper measurement ensures balanced extraction‚ avoiding under or over-extraction‚ and brings out the coffee’s full flavor potential․ This step is crucial for a consistently delicious brew every time․

Safety Precautions
Never press with a loose rubber seal‚ as hot water may shoot up and cause scalding․ Use a sturdy mug and handle the Aeropress securely during pressing to avoid spills and breakage․ Always ensure the seal is tight before pressing to maintain control and safety while brewing․ This prevents accidents and ensures a smooth brewing experience every time․
Handling the Aeropress Safely
Always ensure the rubber seal is secure before pressing to prevent hot water from shooting up and causing scalds․ Use a sturdy‚ wide-base mug to avoid spills and breakage․ Never press into fragile or narrow cups‚ as this can lead to accidents․ Hold both the AeroPress chamber and mug firmly during pressing to maintain control․ Avoid pressing too hard‚ as excessive force may result in breakage or spills․ Keep the AeroPress out of reach of children and avoid touching the hot surfaces during brewing․ Proper handling ensures a safe and enjoyable brewing experience․ Always clean and store the AeroPress correctly after use․
Common Mistakes to Avoid
Avoid using a grind that’s too fine‚ as it can lead to over-extraction and a bitter taste․ Never press too hard‚ as this may cause the AeroPress to break or spill․ Ensure the rubber seal is tightly secured to prevent hot water from escaping․ Avoid using fragile or narrow mugs‚ as they can lead to accidents․ Don’t forget to rinse the AeroPress thoroughly after each use to prevent old coffee oils from affecting the flavor․ Also‚ avoid overheating the water‚ as it can burn the coffee grounds․ Lastly‚ never press without the filter in place‚ as it can result in grounds in your coffee․ By avoiding these mistakes‚ you’ll achieve a smoother‚ more enjoyable brew․
Maintenance and Troubleshooting
Regularly clean the AeroPress after each use to prevent residue buildup․ Inspect the seal for wear and replace it if damaged․ Troubleshoot issues like clogged filters or uneven brewing by checking for proper assembly and grind size consistency․ Ensure all parts are dry before storage to avoid mold․ For persistent problems‚ consult the official troubleshooting guide or contact customer support․ Proper maintenance ensures optimal performance and longevity of your AeroPress․
Cleaning the Aeropress
After each use‚ rinse the Aeropress with warm water to remove any coffee grounds and oils․ For deeper cleaning‚ use mild soap and a soft sponge‚ avoiding abrasive materials that may scratch the surface․ Ensure all parts‚ including the plunger and chamber‚ are thoroughly cleaned․ Dry the Aeropress with a towel or let it air dry to prevent water spots and mold growth․ Regular cleaning maintains hygiene and ensures optimal brewing performance․ For stubborn stains or residue‚ soak the parts in warm soapy water before scrubbing․ Proper maintenance extends the lifespan of your Aeropress and keeps your coffee tasting fresh․
Troubleshooting Common Issues
If you encounter issues while using your Aeropress‚ there are simple solutions to resolve them․ One common problem is leakage during pressing‚ which can occur if the rubber seal is loose or improperly aligned․ Ensure the seal is secure and clean to prevent this․ Another issue is difficulty pressing‚ often caused by using too fine a grind or overloading the chamber․ Adjusting the grind size or reducing the coffee amount can fix this․ If the Aeropress clogs‚ rinse it thoroughly and check for blockages in the filter or plunger․ For stubborn stains‚ soak the parts in warm soapy water․ Regular cleaning and proper assembly can prevent most problems‚ ensuring smooth brewing sessions․

Customization and Experimentation
Experiment with brew parameters like grind size‚ water temperature‚ and steeping time to tailor your Aeropress experience․ Explore various brewing styles to find your perfect cup․
Adjusting Brewing Parameters
Customize your Aeropress brew by adjusting key parameters such as coffee-to-water ratio‚ grind size‚ and steeping time․ A finer grind and longer steeping time yield bolder flavors‚ while a coarser grind and shorter time produce lighter notes․ Experiment with water temperature between 160°F and 205°F to optimize extraction․ For a stronger brew‚ increase coffee quantity or steeping duration․ Conversely‚ reduce these for a lighter cup․ These adjustments allow you to tailor the Aeropress to your taste preferences‚ ensuring each brew is uniquely yours․ Regular experimentation helps refine your technique and explore diverse flavor profiles․
Exploring Different Brewing Styles
The Aeropress offers versatility in brewing methods‚ allowing you to craft various coffee styles․ Try the standard method for a balanced cup or the inverted technique for a richer flavor․ Experiment with espresso-style shots by using a finer grind and higher pressure․ For a smoother drink‚ steep the grounds longer․ You can also make cold brew by steeping in cold water for an extended period․ Additionally‚ the Aeropress can be used to create lattes and cappuccinos when paired with milk frothing․ Each method unlocks new flavors‚ making the Aeropress a versatile tool for coffee enthusiasts to explore and enjoy their favorite brewing styles․
Mastering the Aeropress unlocks a world of perfect brewing․ Experiment with styles and parameters to find your ideal cup․ Keep exploring and enjoying your coffee journey!
Final Tips for Perfect Brew
For a flawless Aeropress brew‚ ensure your coffee is ground to a medium-fine texture and water is heated to the optimal temperature of 165°F to 175°F․ Experiment with the inverted and standard methods to discover your preference․ Use fresh‚ high-quality beans for the best flavor․ Pay attention to the brewing time‚ aiming for 1-2 minutes for espresso-style shots and 2-3 minutes for American-style coffee․ Clean your Aeropress thoroughly after each use to prevent any residual flavors․ Lastly‚ don’t be afraid to adjust parameters like grind size or water temperature to suit your taste preferences․ Consistency is key‚ so practice makes perfect!
Encouragement to Experiment
Embrace the versatility of the Aeropress by exploring various brewing styles and techniques․ Don’t hesitate to tweak parameters such as grind size‚ water temperature‚ and steeping time to create unique flavor profiles․ Try the inverted method for a richer‚ fuller-bodied coffee or the standard method for a cleaner‚ more tea-like brew․ Experiment with different coffee-to-water ratios to find your perfect balance․ The Aeropress is not just a brewing device—it’s a canvas for creativity․ Remember‚ every cup is an opportunity to innovate and discover new flavors․ Happy brewing and enjoy the journey of perfecting your craft!